Thursday, May 28, 2015

Sony PJ380 mts to prores-Editing Sony HDR-PJ380 AVCHD .mts files in Final Cut Pro X, FCP 7

To make Sony HDR-PJ380 108060p footage compatible with FCP X, you can get the best Mac AVCHD to MOV converter and convert Sony PJ380 1080 60P AVCHD to ProRes 422 .mov or ProRes 4444 .mov for Final Cut Pro on Mac (Yosemite included).

Sony HDR-PJ380 is a very popular sellers in the Sony Handycam series, and also in the photography market. You may have bought one and need to edit Sony Handycam MTS files from PJ380 on Mac. So, come with a question- how to transfer Sony Handycam videos to Mac and edit with Final Cut Pro or other programs?

"Just got my new Sony PJ380. According to the Sony site, this camcorder allows me to record in either AVCHD or MP4. Both are HD content, correct? But the MP4 is easier to edit, I hear. Will I be able to import HD content into my iMAC and work with it in FCP 7?"

While, it’s a bit frustrating, the MTS/M2TS files from Sony HDR-PJ380 always grey out when importing them to FCP X. In fact, due to its high rate compression and special codec of the Sony HDR-PJ380 output AVCHD video, it seems to be a bit difficult to play and edit Sony Handycam MTS files.

In order to get these Full HD AVCHD files supported by FCP, you need to convert 60p/50p AVCHD to ProRes, the most compatible video codec with FCP, then you can edit the converted ProRes MOV files in FCP and play them on Mac. Thus, a powerful and professional AVCHD to ProRes Converter is the most important tool in the problem-solving process. Brorsoft MTS/M2TS Converter for Mac (a yet professional Mac MTS to FCP Converter tool) is a quick fix for you. It can generates best editing format/codec for filmmakers and video enthusiasts to use in different NLE apps, such as Final Cut Pro 6/7/X, Adobe Premiere Pro CS4/CS5/CS6, Avid Media Composer, Adobe After Effects, iMovie, Final Cut Express and more.

How to Transcode Sony HDR-PJ380 MTS to ProRes for FCP X

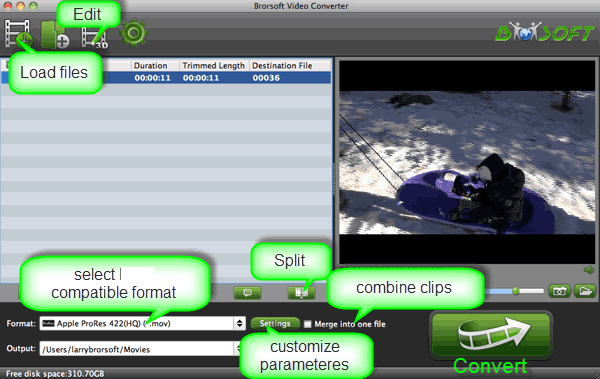
Step 1. Launch the MTS Converter for Mac and click add button to import MTS, M2TS files to the program.


Step 2. Click the format bar or the pull down menu of “Format” to select output format. To get Sony PJ380 AVCHD into Final Cut Pro X, the best format is “Final Cut Pro> Apple PreRes 422”.


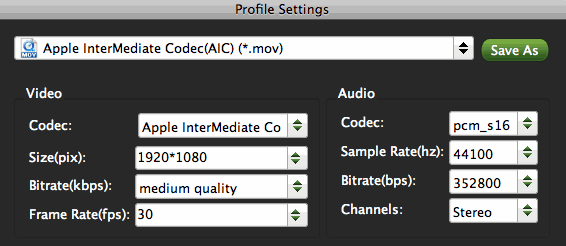
Step 3. Set Parameters (Optional) Tap the “Settings” icon to customize the video/audio settings for Final Cut Pro: 1920*1080 vide size; 30fps frame rate(for original 60p videos) to keep the best output quality.


Step 4. Click the “Convert” icon under the preview window, and the Mac MTS to ProRes Converter will start transcode Sony HDR-PJ380 MTS to Prores MOV for FCP(X) on Mac.

After the conversion process bar at 100%, you can click the “Open” icon to locate the converted ProRes MOV files. Now you can click File –> Import –> Files to import Sony MTS recordings to Final Cut Pro X without problems.

Additional Tips:
If you are also a FCP X user, before you try to do the conversion, don’t forget to make sure that you have installed the Apple ProRes Codec manually since the FCP X asks users to install it by themselves.

More Guides:

Sony HDR-TD30V Workflow to iMovie/FCE
Convert Sony Handycam Files on Mac and Windows
Sony HDR-PJ580V AVCHD to Adobe Premiere Pro
How to import Panasonic DMC-ZS3 MTS files into iMovie
Tips working Sony EX1/EX3 XDCAM EX MP4 in Premiere Pro
Upload Sony HDR-PJ380 MTS to AIC .mov in iMovie/FCE
Import H.265 video files to Edit in iMovie on Mac OS X(Yosemite)
Edit XAVC-S files from Sony DSC-WX500 to Premiere Pro CC, CS6
Edit 4k XAVC-S files from Sony FDR-AXP35 in Final Cut Pro 7
Edit AVCHD .mts files from JVC Everio in iMovie/FCE/FCP/Avid MC
Import Sony DSC-RX100 1080/60p MTS to Final Cut Pro 7 on Mac OS X
Canon XA10 AVCHD to FCP Converter - Importing AVCHD Footages to Final Cut Pro 7 on Mac OS X
Final Cut Pro Import Problem - How to Transfer AVCHD Footages from Panasonic HC-X800 to FCP

Monday, May 25, 2015

Lumix FZ1000 4K/1080p video to FCP 7/X - Import MP4/AVCHD/MTS from Panasonic FZ1000 to FCP

Applying the best Panasonic Lumix FZ1000 video converter, you can convert Panasonic FZ1000 MP4, AVCHD, MTS for importing into to FCP with easy editing.

The Panasonic Lumix FZ1000 is a DSLR-styled super-zoom camera with a 16x / 25-400mm range, a decent-sized 1in sensor and 4k video recording capabilities. The FZ1000 has a fully-articulated (but not touch-sensitive) 3in LCD screen and a 2359k dot OLED viewfinder (the same as the Lumix GH4) for composition, offers top shutter speeds of 1/4000 or 1/16000 (with its mechanical or electronic shutters respectively), 12fps continuous shooting, built-in Wifi with NFC, autofocusing which works down to -4EV and exploits the defocus profiling debuted on the GH4, an external mic socket (but no headphone jack), and support for 1080p video at up to 120fps (100fps in PAL regions), or 4K UHD at 25 or 30fps depending on region.

Currently 4K footage is not widely supported, only a few video editing program like FCP X 10.1 can support it, but not the old version FCP X or Final Cut Pro 6/7. In order to edit Panasonic FZ1000 4K MP4 files in Final Cut Pro smoothly, the easy workaround is to use 3rd-party to rewrap and convert Panasonic FZ1000 4K footage to a more "editable" format in 1080p.


Converting Panasonic FZ1000 4K footage to FCP compatible video

1. Download Brorsoft Video Converter for Mac

Overall, this program is a completely professional Mac 4K video converter, player and editor. Unlike some free video converters, it provides hundreds of output format presets for 4K videos, such as Apple ProRes 422, Apple ProRes 4444 for Final Cut Pro, AIC MOV for FCE (Final Cut Express) and iMovie, for better editing and playing. This Ultra HD 4K Video Converter is also available to customize the output resolutions to any size the users want. Thus, with the video converter app, you can fast transcode Panasonic FZ1000 4K MP4 files to FCP, iMovie, FCE friendly format with ease.

2. Launch the 4K file converter and click add button to import Panasonic 4k clips to the program for converting.


3. Click "format" bar to choose the output format. You can freely choose Final Cut Pro > Apple ProRes 422 (*.mov) for FCP.


3. Click the "Settings" button and customize proper video/audio parameters including Video size, bitrate and fame rate and mroe. Usually 1920*1080 video size and 30fps video frame rate are recommended for FCP editing. Well, if you prefer to work with 4K video, you can keep original video size to get 4K ProRes for FCP.

4. After all necessary settings, hit the convert button to start the Panasonic FZ1000 4K video to ProRes conversion on Mac OS X.

Once the conversion process shows in 100%, click Open to get the output videos. Create a project and start editing converted Panasonic FZ1000 4K files in FCP 6/7/X with light speed.

Related Guides:

How to import Canon C300 to Premiere Pro
Import H.264 MP4 from GoPro Hero 2/3 to AE
How to Import 4K video to Final Cut Pro 6/7/X
Converting Nikon D610 MOV to iMovie/FCE/FCP
Is it possible to edit DJI Inspire 1 4K files in FCP X/7
Edit Sony RX50 with Premiere Pro CS4/CS5/CS6/CC
Editing Sony FDR-AX1 4K XAVC S MP4 video in iMovie
How to use PMW-RX50 footage in Final Cut Pro 7, FCP X
Can't Edit Sony FDR-AXP35 XAVC S Files in Final Cut Pro?
How to Import Sony PDW-HD1550 XAVC to Final Cut Pro 7/X
A workaround to edit Nikon D610 MOV in Windows Movie Maker
Import Sony F3 XDCAM EX MP4 files to Premiere Pro CC/CS6/CS5
Solve Adobe Premiere CC/CS won’t import XAVC S files from Sony AXP35

Friday, May 22, 2015

VOB to iMovie (Yosemite & Mavericks): How to convert and import VOB files to iMovie11/10/09

Follow the easy workaround below to solve the problem of importing VOB video files into iMovie for further editing.


If you have got some VOB videos, you will be disappointed when you want to import VOB files to iMovie for further editing and find the program can’t support the format. Fortunately, there is an easy way to solve the issue. Find it out here.

The main reason why you can not transfer VOB video files from to iMovie, incuding iMovie 8/9/11 is that iMovie still can’t recognize VOB format. As far as I know VOB is basically a MPEG-2 video file which is stored in Video_TS folder in a DVD. As this kind of video file usually contains one or several audio tracks and subtitle tracks that are multiplexed together into one stream form, it is not so easy to playback or edit.

If you’re in such a situation, there is an easy way to fix the issue. Since Apple InterMediate Codec(AIC) is the most compatible codec introduced by Apple which ensures maximum editing quality and efficiency when working with iMovie, the common practice for VOB to iMovie workflow is, get a VOB to AIC Converter and transcode the .vob files to AIC MOV, which will save you both time and trouble, and all you need is to drag the result videos for prompt editing. For this purpose, this article will show you how to transcode VOB to AIC MOV in detail.

How to Convert VOB for Editing in iMovie smoothly

Step 1: Download, install and run Brorsoft Video Converter for Mac, and then click the “Add” button to load the .vob videos. You can also use the drag-and-drop method to load the media files to the application UI.

The program is an easy-to-use yet professional app which can be used as a VOB video converter under Mac OS X 10.9 Mavericks, 10.8 Mountain Lion, 10.7 Lion, Snow Leopard 10.6, Leopard 10.5. It is free, clean and safe to install and use. With it, you can effortlessly transcode VOB to AIC MOV for iMovie 08/09/11/FCE, Apple ProRes MOV for Final Cut Pro X/7/6, DNxHD for Avid MC, etc. and it works well and converts flawlessly.


Step 2: Click the Format box and select iMovie —> Apple InterMediate Codec(AIC) (*.mov) as output format.


Tip: Click the Settings icon to adjust video and audio parameters on the Profile Setting as you need to get the best quality video.


Step 3: Click the “Convert” icon under the preview window, and the Mac iMovie AIC Converter will start transcode VOB to AIC MOV for iMovie 08/09/11 on Mac.

After the conversion, click “Open” to locate the result videos and then launch iMovie, choose File > Import > Movies…, to import the converted VOB video into iMovie; prepare for editing. You will find that it’s just a piece of cake to edit VOB files in iMovie.

See more:

How to Play AVI files with QuickTime on Mac
Uploading MPEG-2 (.mpg) files into Final Cut Pro X
Edit Sony DSC-WX500 in FCP 7, FCP X(Yosemite)
Solve FCP 7/X won't Import MTS files from NEX-FS700R
Import MPG/MPEG File for Final Cut Pro, FCP X Editing
AVI to MOV: How to Convert AVI to QuickTime MOV on Mac
Convert MKV files to Edit in Avid Media Composer 5/5.5/6/6.5/7
Panasonic P2 MXF to AIC .mov lossless conversion for iMovie 8/9/11
Can Avid MC/Premiere Pro ingest Panasonic P2 MXF footage directly?
Transcode Sony DSC-WX500 XAVC-S files to Adobe Premiere Pro CC/CS6

Thursday, May 21, 2015

Convert C300 video to FCP X/7-Canon EOS C300 MXF Video Converter on Mac (Yosemite)

Canon EOS C300 converter mac is one versatile tool to convert Canon EOS C300 videos to other popular video files like MOV/WMV/AVI/FLV etc freely and perfectly on mac. Read this article, and find out the best way to import Canon C300 video to Final Cut Pro 7, FCP X on Mac OS X (Yosemite & Mavericks).

We usually saw Canon C300 camera users encounter importing issues when attempting to edit their C300 MXF files with Final Cut Pro 6 or FCP 7. Let’s see some frequently asked questions on this.

Q1: importing .MXF files to Final Cut
What plug-in do I need to install so i can import and edit .MXF video files in Final Cut. The suggestion of doing Log and Transfer doesn’t work (the .MXF files are gray out not allowing me to select it.) [Final Cut Pro 7, Mac OS X (10.5.8)]

Q2: MXF files into FCP 6
I’m interested in the new Canon C300 camera, but I’m still working on an Apple G5 with FCP 6.0.6. Is there an application, plug-in, etc. for the older FCP to take in MXF files? [G5, Mac OS X (10.4.11)]

Q3: Support for Canon MXF from C300 in FCP?
How do I import .mxf files into Final Cut Pro? This is the latests and greatests software right? There must be a way. Help Please.

As you see, many folks are talking about how to import Canon C300 MXF files into Final Cut Pro 6 or 7 for editing without problems. Well, don’t blame to the Final Cut Pro, the “Import from Camera…” option works just like “Log and Transfer”. The thing is, even FCP 7 does not work with the Canon or Panasonic P2 MXF codec. As far as i know, to solve those problems, the most important piece of the equation is that transcoding MXF files to Final Cut Pro native formats (Apple ProRes encoded .mov is highly recommended). Along with some help from the MXF Converter for Mac, it can be done. To help those who wanna edit C300 MXF files in FCP 6/7, here I share with you a simple guide on how to convert Canon C300 MXF files to Apple ProRes MOV format for Final Cut Pro editing flawlessly.

Downloading the App- Brorsoft MXF Converter for Mac

Overall, the program is a professional yet easy-to-use MXF to MOV Converter on Mac OS X which can not only convert Canon C300, XF100, XF105 and XF305 recorded MXF files to Apple ProRes codec videos for Mac editing, but also provide simple video editing functions for you. The mac MXF to ProRes Converter can convert HD videos from HD camcorders or DVs (like JVC, Panasonic, Sony and Cannon) for editing in Final Cut Pro, Final Cut Pro X, Final Cut Express, iMovie, Avid MC, Adobe Premiere Pro etc. Just download it and follow the tutorial below to get the work done.

Guide: Transcoding Canon C300 MXF files to Apple ProRes MOV for FCP 6/7


Step 1: Import MXF files from your C300 to the MXF to FCP Converter Mac.

Note: Before conversion, you need to transfer MXF files from your Canon C300 to Mac Hard Drive, then click the “add files” button to browse to import MXF videos.

Step 2. Click the format bar, and move mouse cursor to “Final Cut Pro > Apple ProRes 422 (*.mov)” as output format.

Step 3. Click “Convert” button to start transcoding C300 mxf files to Apple ProRes MOV for Final Cut Pro 6/7 under Mac OS.

Some more helpful features of the Free Mac MXF to MOV Converter:

1. Settings- click to set video resolution(1920×1080/1440×1080/1280×720/720×480), bitrate(from 1Mbps to 20Mbps), frame rate (24p/30p)


2. Editor (next to “Add” icon)- click to set deinterlace, denoise, mute, volume up, trim, crop, etc.

Once the MXF to ProRes 422 conversion is done, you can transfer Canon C300 MXF footage into Final Cut Pro 6/7 for editing smoothly on Mac with ease.

If you have problems when importing or editing your Canon, Sony, Panasonic etc, camera video files, you can check out “Brorsoft Camcorder/Camera Importing Tips” or “FCE, FCP, iMovie Column"to get your solutions.

Related Guide & Tips:
Transcoding Canon C300 MXF for iMovie
Import 4K MP4/MOV from DJI inspire 1 to AE
Canon C300 and Adobe Premiere Pro editing tips
Importing Sony PDW-HD1550 XAVC to FCP 7/X
How to edit Canon C300 MXF files in Final Cut Express
How to work Sony PMW-RX50 XAVC in FCP 7/FCP X
How to work Sony PMW-RX50 XAVC in Premiere Pro CC/CS6
Editing AVCHD footage in MTS, M2T, M2TS file format in FCP
Import MPEG HD422 50 Mbps recording on Sony PMW-200 to Avid MC

Sunday, May 17, 2015

FLV to MOV for FCP-Import and Edit FLV files in Final Cut Pro 7, FCP X on Mac (Yosemite & Mavericks)

Final Cut Pro supports for QuickTime video formats up to HD resolutions, but not FLV. To import FLV videos into Final Cut Pro. Conversion from FLV to MOV is necessary. Find the perfect solution to import FLV files to Final Cut Pro on Mac OS X (Yosemite & Mavericks) for editing or converting.

Source From: Open and edit FLV files in Final Cut Pro 6/7/X

I am trying to import FLV files into Final Cut Pro, but the program can’t directly ingest the file. Should I find a way to convert them into something that Final Cut Pro is happy with?

I like do some editing with my source videos including MTS, MXF camera/camcorder recordings, or some other common files like FLV, AVI, etc, then upload to YouTube, Viemo to share. However, when I try importing FLV to Final Cut Pro, the FLV videos can’t be played an edited smoothly in the program.

Searched widely and I got some tech support for loading FLV files into FCP correctly.

Solution 1: Since we cannot import FLV files into Final Cut Pro directly, what we can do is to download Perian, a free, open source QuickTime component that adds native support for many popular video formats. With the Perian plug-in installed, we can then open the FLV clip in QuickTime. Try opening it there and export from QT into your desired format for FCP program.

Note: Perian is no longer under development and does not work with QuickTime 10 or above.

Another solution:

Another great application to add is Brorsoft Video Converter for Mac. It works perfectly under Mac OS X Snow Leopard, Lion, Mountain Lion, Mavericks, and Yosemite. If you download this video convert application, you can open FLV files as well as AVI, MKV, VOB, MXF, MTS, XAVC, MVI, etc and transfer them to many format you need including Apple ProRes for FCP, AIC for iMovie/FCE, DNxHD for Avid, MPEG-2 for Adobe Premiere Pro… Download it now to achieve your goal.

Transcoding AVI files to ProRes for Apple Final Cut Pro:

Step 1: Run FLV to FCP Converter for Mac and you can import FLV clips to the program through “Add Video” button button. If you like, check the “Merge into one” box to join FLV clips together.


Step 2: Choose output format. This video converter offers optimized format preset for Final Cut. Just click “Format” menu firstly and then follow “Final Cut Pro” to set Apple ProRes 422 (*.mov)” format.


Tip: If the default settings do not fit you requirement, you can click “Settings” icon to and enter “Profile Settings” panel to adjust video size, bit rate, frame rate, sample rate and audio channels.

Step 3: Click “Convert” button to start encoding FLV to ProRes .mov for Final Cut Pro 6/7 or FCPX on Mac OS X.

When the FLV to MOV conversion task is finished, click “Open” button to get the exported files for transferring to Final Cut Pro 6/7 or FCPX with easy playback or editing.

Additional Tips:

1. This FLV to Final Cut Pro Converter not only can help you convert .flv to FCP, but also enables anyone with FLV files to use in any non-linear editor like Adobe Premiere Pro, iMovie, FCE, Avid Media Composer, etc as long as transcode FLV to a recognizable format.

2. If you have problems when importing or editing your Canon, Sony, Panasonic etc, camera video files, you can check out “Brorsoft Camcorder/Camera Importing Tips” or “FCE, FCP, iMovie Column” to get your solutions.

See also:

How to Convert VOB to Work With Final Cut Pro
Howto Import MKV/AVI/WMV files to Final Cut Pro
Import FLASH FLV/F4V to iMovie/Final Cut Express
Tips Ripping DVDs to Surface 2 playable MP4 video
Resize DJI Inspire 4K files to 1080p for easily editing
Sony FDR-AXP35 4K XAVC S to iMovie workflow
Play and Edit iPhone videos on Windows Movie Maker
Converting VOB to MP4 for viewing on Android gadget
Editing Nikon 1 V2/D5100/D3100/D800 MOV in Premiere
Best method to import mkv to premiere pro without quality loss
Import Blackmagic Ursa 4K footage to Premiere Pro CC/CS6/CS5
How to import Tivo videos to iTunes for Easy Playback on iPhone/iPad

Wednesday, May 13, 2015

DNxHD to FCP X/7/6-Convert and Import Blackmagic DNxHD MXF files to Final Cut Pro 7/X Editing

Do you all have any experience of working DNxHD videos in FCP? I've got a Blackmagic Design Hyperdeck Shuttle. I recorded some uncompressed Quicktime clips and some MXF Clips that should be recorded using DNxHD 185 / 220. I'm trying to import DNxHD files to FCP but they show with a black screen on the thumbnails in the import tab. After imported, there is only black video and no sound once played. What could be causing that? How can i edit them?

Blackmagic Design Hyperdeck Shuttle and Blackmagic Design Hyperdeck Studio recorded DNxHD MXF files are not compatible with editing softwares like FCP X/7/6. In this case, you may need to convert Blackmagic DNxHD MXF to ProRes 422, ProRes 4444, etc. format for further use, now in this article you will get the best Blackmagic DNxHD MXF Converter.

To get the work done, Brorsoft Video Converter for Mac is highly recommended to you.

Overall, the program is a professional yet all-in-one video conversion tool. With it, you can easily convert all DNxHD files to ProRes 422, ProRes 422 HQ or 4444 for using in Final Cut Pro X/7/6. Besides, the Mac video converter can convert MKV, AVI, WMV, MPG, VOB for editing in Final Cut Pro, Final Cut Express, iMovie, Avid MC, Adobe Premiere Pro etc. Some simple video editing functions like trim, crop, watermark are also provided for you. Just download it and follow the tutorial below to convert DNxHD to Apple ProRes for FCP.

(Note: Click here for OS X 10.5)Full Guide on Converting DNxHD to ProRes on Mac OS X

Step 1. Load DNxHD files

Install the DNxHD to ProRes converter program on Mac and run it. Drag the Avid DNxHD files to the software. Or you can also click "Add" button on the top of the main interface to import video to the app.


Step 2. Select output format

Hit the "Format" bar and select Final Cut Pro > Apple PreRes 422(*.mov) as output format. This format is specially designed for FCP X.


Tip: Adjust the video and audio parameters, including the Bitrate of Video & Audio, Video Size, Sample Rate, Frame Rate, Audio Channels, etc., by clicking the Settings button on the main interface for getting the best quality.

Step 3. Start conversion

Tap "Convert" button on the main interface to start DNxHD to ProRes conversion on Mac OS X.

You can check the conversion process in the Window. After the conversion, it is easy to import the transcoded DNxHD videos to Final Cut Pro X or FCP 7 for further editing.

More Topics:
Avid MXF files in Final Cut Pro
iPhone video to Final Cut Pro best workflow
Import iPhone videos to Pinnacle Studio for editing
How to Import MP4 Video to Adobe Premiere Pro CC/CS6
Alternative to Handbrake for encoding H.265/HEVC videos
How to get Pinnacle Studio 17 Recognize iPhone Video files
Transcode Canon Vixia MTS Converter for iMovie (Yosemite)
Work DJI Inspire 1 4K video with FCP, Premiere Pro, Avid MC
Capturing with iMovie 11/09/08 and Canon Legria VIXIA HV40
Edit Panasonic G5 AVCHD video in iMovie 11/10/09 (Yosemite)
How to bring Sony AXP35 4K XAVC S to Premiere Pro CC/CS6
How to work with Sony FDR-AXP35 XAVC S footage in FCP 7/X
Source: Converting DNxHD to ProRes 422 on Mac(Yosemite, Mavericks)

Tuesday, May 12, 2015

Brorsoft DVD Ripper Enables you to rip and convert DVD on Windows 10 easily and quickly

Want to convert DVD in Windows 10 so that you can play your DVD movies anywhere you like? Look no further! Simply follow this article to get it done!

Source From: How to use DVD Ripper for Windows 10 for ripping & copying

The long-awaited Windows 10 now is there with a much better performance than its predecessors. However, if you've upgraded your PC to Windows 10, you'll be bothered by the DVD playback or DVD ripping issue since Windows 10 doesn't come with a default DVD player and some of your programs may not work in Windows 10 any more. In this case, there is a great chance that you're looking for a DVD ripper that is compatible with Windows 10 to help you rip DVD in Windows 10 so that you can play your DVD movies without any hassles.

To convert DVD movies on Windows 10 more efficiently, what you need is a more professional DVD ripping tool which should be constantly updated to fit with the latest technology that can fully compatible with Windows 10. Overall, the best program I can recommend for handling DVD in Windows 10 is Brorsoft DVD Ripper.

This Windows 10 DVD Ripper makes it easy to rip and convert DVD on Windows 10 PC. With it, you can convert a DVD into any regular video formats like MP4, AVI, WMV, MKV, FLV, MOV, MPG, etc as you want. And one best advantage of this DVD ripping software is that it provides kinds of optimal video presets for Android, iOS, Windows based portable devices like iPhone, iPad, Samsung Galaxy Tab, Google Nexus 7, Nook HD, Apple TV, Surface Pro, etc. Other features like editing, copying entire DVD disc are all provided for you. Below is the tutorial for you. You only need a few mouse clicks.

How to Rip and Convert DVDs on Windows 10

1. Load DVD movies

Insert the DVD disc into DVD drive and run the program. Click DVD button to add the DVD movie. As you see, DVD disc, ISO, IFO and DVD folder are all well supported.


2. Decide output video format

Click Format bar and you'll see the format list below. Simply select one you prefer as the output format. You can choose regular video formats like AVI, MP4, WMV, FLV, MKV, MOV, etc from Common Video. Or you can choose a video preset for portable devices like iPhone, iPad, Galaxy Tab, etc.


3. Start ripping DVD in Windows 10

When all necessary settings are settled, click the Convert button to start converting DVD on Windows 10 to the video format you’ve selected automatically.

Additional Features of the Widows 10 DVD Ripper:

a. Before conversion, you can go to the “Settings” to set the parameters for your movie. To compress the file size, adjust the parameters to be smaller.

b. You can choose the subtitles which you want to keep. Just click the drop down menu after “Subtitles” to select your desired one.

c. Click Edit button and you can trim, crop or adjust the video with the built-in video editor to get the very part and effect of the DVD movie you want.

After the conversion, click "Open" button to locate the ripped DVD files and easily play them on your Windows 10 PC or transfer to portable devices for watching anywhere you like.

See more:

How to Rip DVDs on Mac 10.9 Mavericks
How to Rip and Convert DVDs in Windows 8
How to Rip, Convert and Copy Furious 7 Blu-ray
Play DVD movies on Chromebook in mp4 video
Rip and Copy Best Furious 7 DVD Movies to MP4
Ripping DVDs to Chromebook for smooth playback
Rip DVD to H.264 MP4 for Chromebook for Playback
How to Import MP4 Video to Adobe Premiere Pro CC/CS6
Alternative to Handbrake for encoding H.265/HEVC videos
How to Rip, Convert and Copy DVD on Mac OS X Yosemite
Convert Sony SLT-A77 Mark II XAVC S to DNxHD for Avid
How to use DVD Ripper for Windows 10 for ripping & copying
Convert MP4 to MPEG-2 for Adobe Premiere Pro CC/CS6 editing

Thursday, May 7, 2015

Optimal workflow to edit Canon C500 MXF files in Final Cut Pro 6/7/X (Yosemite & Mavericks)

The best solution to the importing problem happened when you want to ingest Canon C500 MXF recordings to Final Cut Pro 7 on Mac OS X 10.10 Yosemite, and 10.9 Mavericks included.

Canon C500 is an impressive 4K Cinema Camera, which has the ability of capturing 2K footage (2,048 x 1,080 pixels) at 12-bit, full 4K RAW output of up to 4096 x 2160 pixels. As the Canon C500 owners, you can enjoy vivid video recordings. The point here, many users are facing issues and find it’s a painful experience to import Canon C500 footage into Final Cut Pro (which includes the FCP X, FCP 7, FCP 6).

Q: Workflow with Canon EOS C500 to FCP 7

“I'm working on the post of a project filmed with the Canon EOS C500 in 1080p, I was told in the beginning that that camera delivers de 1080p clips in Apple Pro Ress, but now I'm told from various sources that it delivers them in a strange format, probably mxf, also told that a lot of people have had trouble transcoding those into apple pro res to edit them. I was wondering if anyone here could give me some advices or heads up about the most optimal workflow to edit those files in Final Cut Pro 7.”

As you see, the C500 user is seeking for a solution to importing Canon C500 MXF files into Final Cut Pro for editing without problems. Have you also met the trouble and got frustrated? Well, don’t blame the Final Cut Pro, the “Import from Camera…” option works just like “Log and Transfer”. The thing is, even FCP 7 does not work with the Canon or Panasonic P2 MXF codec. As far as I know, to solve those problems, the most important piece of the equation is that transcoding MXF files to Final Cut Pro native format (Apple ProRes encoded .mov is highly recommended). Along with some help from the MXF Converter for Mac, it can be done. To help those who wanna edit C500 MXF files in FCP 6/7 and FCP X, here I share with you a simple guide on how to convert Canon C500 MXF files to Apple ProRes MOV format for Final Cut Pro editing flawlessly.

Downloading the App- Brorsoft MXF Converter for Mac

Overall, the program is a professional yet easy-to-use MXF to MOV Converter on Mac OS X which can not only convert Canon C500, Canon C300, XF100, XF105 and XF305 recorded MXF files to Apple ProRes codec videos for Mac editing, but also provide simple video editing functions for you. The Mac MXF to ProRes Converter can convert HD videos from HD camcorders or DVs (like JVC, Panasonic, Sony and Cannon) for editing in Final Cut Pro, Final Cut Pro X, Final Cut Express, iMovie, Avid MC, Adobe Premiere Pro etc. Just download it and follow the tutorial below to get the work done.

Guide: Transcoding Canon C500 MXF files to Apple ProRes MOV for FCP 6/7/X

Step 1 -> Download, install and launch Brorsoft MXF Converter for Mac, and import MXF files into the program

Note: Before conversion, you need to transfer MXF files from your Canon C500 to Mac Hard Drive, then click the "add files" button to browse to import MXF videos.


Step 2 -> Click the format bar, and move mouse cursor to "Final Cut Pro > Apple ProRes 422 (*.mov)" as output format.


Step 3 -> You can click "Settings" button to adjust the resolution, bitrate, etc. Just customize the parameters to meet your need. You can set video resolution(1920×1080/1440×1080/1280×720/720×480), bitrate(from 1Mbps to 20Mbps), frame rate (24p/30p), etc


Step 4. -> Click “Convert” button to start transcoding C500 mxf files to Apple ProRes MOV for Final Cut Pro 6/7 /X under Mac OS with the ideal MXF to ProRes Converter Mac.

Once the MXF to ProRes 422 conversion is done, you can transfer Canon C500 MXF footage into Final Cut Pro 6/7/X for editing smoothly on Mac with ease.

If you have problems when importing or editing your Canon, Sony, Panasonic etc, camera video files, you can check out “Brorsoft Camcorder/Camera Importing Tips" or "FCE, FCP, iMovie Column"to get your solutions.

Related Guide & Tips:

Solve Canon XA25 importing issues with iMovie
Converting Canon C500 MXF files to Adobe Premiere Pro
Use Sony FDR-AX30 4k in Premiere Pro CC/CS6 smoothly
Canon C500 and Sony Vegas Pro/Pinnacle Studio Workflow
How to Rip and Transfer DVD movies onto Kindle Fire HDX
Can’t import Canon C500 MXF video to Adobe Premiere Pro?
How to import Canon C500 MXF files to Avid Media Composer
Convert Sony FDR-AX30 XAVC S to FCP X, Final Cut Pro 7/X
Sony FDR-AX30 Video Converting/Editing Tips in iMovie 11/09/08

Sunday, May 3, 2015

How to Import media files from Sony EX1 to Final Cut Pro X?(Yosemite)

This article outlines the recommended workflow for importing the XDCAM footage captured by Sony PMW-EX1 into Final Cut Pro X for smoothly editing.

The EX1 is slightly larger and 400 grams heavier than its forbearer, the Sony Z1 HDV cam. One giant difference between the Z1 and EX1 is that the latter has no tape mechanism. The video is recorded on to Sony’s brand-new solid-state format, the SxS memory card.

The EX1 captures video images via three 1/2-inch CMOS sensors and processes this information into a variety of video formats but they are all HD. If you require standard- definition video then all you have to do is down convert when you play out from the camera to your capture device.

As far as we know, native EX and XDCAM support may be up to Sony, not Apple. There is no “native” XDCAM EX support (unlike native DSLR support) in FCP X- and the XDCAM Browser won't do the trick, nor will the Clip Browser. You have to use something you may not have used before: XDCAM Transfer. Using this plug-in, you can view thumbnails of your video clips and import the videos into your Final Cut Pro project. But the most troubling of all is that some users even struggled to download the plug-in, problems still occurred during the importing process. How to solve the problem?

In fact, you need an exporting tool to get the original MP4 files rewrapped and then you can transfer Sony PMW-EX1 XDCAM files to Final Cut Pro X or FCP 7. An here Sony’s XDCAM EX Clip Brower is required, which can edit metadata and transfer the media to a hard drive for later importation. When it goes to the XDCAM EX Clip Brower rewarp workflow, you have two ways. The first one is that you can take Sony XDCAM EX Clip Brower as a plug-in within FCP and then import and edit the original files via it. The other way is to make it as stand alone, thus you can create the MXF files and save it on your HDD. The second way is highly recommended in case of the loss of data and you can keep the .mxf files for other usage. When you get the rewrap clips and want to edit PMW-EX1 XDCAM EX rewrapped MXF files in Final Cut Pro, you will meet the incompatiblity problem, since the FCP can not support the .mxf video files.

In this situation, the best method is to convert rewrapped MXF files (or the original MP4 files) to ProRes codec, which ensures maximum editing quality and efficiency when working with Final Cut Pro X and FCP 7. It’s a great way to achieve your goal smoothly. For this purose, this article will show you how to transcode Sony EX1 files to ProRes MOV in detail.

Wokflow: Converting Sony EX1 MP4/MXF files to Apple ProRes MOV for FCP X/7

The quick woraround is to use the easy-to-use yet professional app called Brorsoft Video Converter for Mac which can used under OS X Leopard (10.5), Snow Leopard (10.6), Lion (10.7), Mountain Lion (10.8). It is free, clean and safe to install and use. With it, you can effortlessly transcode Sony EX1 original MP4 files or rewrapped MXF files to ProRes MOV for editing smoothly in Final Cut Pro 7 and FCP 7. It works well and converts flawlessly.

Step 1: Download and instal this Sony XDCAM Converter to your Mac, and then import PMW-EX1 files into it. You’d btter Connect Sony PMW-EX1 to Mac and rewrap the mp4 files to MXF file folder in advance.

Tips:

1. If you want to merge MXF files, just need to check the “Merge into one” box.
2. You shouldn’t move the single MXF video out of the whole MXF whole structure folder, or the MXF video would loss some metadata, such as sound.

Step 2. Click the format bar, and move mouse cursor to “Final Cut Pro > Apple ProRes 422 (*.mov)” as output format.


Tips: You’d better click settings to set the video frame rate as 30fps, video size as 1920*1080 to keep the best quality for editing in Final Cut Pro if the 60i/30fps is your original frame rate. But if you shoot with 50i/25fps, then 25fps as the frame rate will be your best choice when conversion.


Step 3. Click “Convert” button to start transcoding Sony EX1 MP4/Rewrapped MXF files to Apple ProRes Codec for Final Cut Pro X or FCP 7 on Mac OS.

So there you have it. Pretty simple. After the workflow, you can go to the output folder to find the converted video files. Now you are free to log and transfer or import/edit Sony PMW-EX1 files in Final Cut Pro X or FCP 7 under Mac without problems.

Additional Tips:

1. If you are also a FCP X user, before you try to do the conversion, don’t forget to make sure that you have installed the Apple ProRes Codec manually since the FCP X asks users to install it by themselves.

2. If you want to edit Sony EX1 files in iMovie, you just need to choose the “iMovie and Final Cut Express -> Apple InterMediate Codec (AIC) (*.mov)” in the second step.

3. If you want to batch conversion, the professional iMedia Converter for Mac is the best choice for you.

More Topics for you:
Edit MP4 files in iMovie 11/09/08 with AIC MOV format
Convert Sony HX90V XAVC S to ProRes for Final Cut Pro
Edit Sony PMW-EX3 MXF files in Windows Movie Maker
Import/convert MPG to Final Cut Pro (X) on OS X Yosemite
Converting DNxHD to ProRes 422 on Mac(Yosemite, Mavericks)
Import Canon C300 mxf footage into Avid, Premiere, iMovie, FCP
Enable Premiere Pro to ingest Panasonic DMC-CM1 4K MP4 video
How to Import Sony PMW-EX1/PMW-EX3 footage into Premiere
Importing Sony PMW-EX3 XDCAM footage into Final Cut Pro X
How to import Sony PMW-EX1R MP4 footage to Final Cut Pro X
How to Import footage from Sony PWM-EX1/EX1R to Avid Media
Take GoPro Hero 2/Hero3 footage and import to Premiere Pro CC/CS6