Monday, November 24, 2014

Edit Sony PXW-X200 XAVC Long Gop in Avid Media Composer

Summary: The Avid Media Composer won't import XAVC files from Sony PXW-X200 smoothly. The easy workaround is to transcode Sony XAVC video to a more editable codec DNxHD. Here is how.


Sony's new addition to its XDCAM range of solid state memory camcorders, the PXW-X200, incorporates an improved 1/2 inch-type Exmor 3CMOS sensor, a new 17x zoom lens and XAVC Intra/Long GOP recording with 4:2:2 10-bit sampling. In XAVC, the user can select Intra-frame compression at a maximum of 112 Mbps or high-efficiency Long GOP compression at 50/35/25 Mbps. After capturing some outstanding videos, you may wanna transfer Sony PXW-X200 XAVC to Avid Media Composer or other NLEs for further editing. However, the problem is that the XAVC and Avid workflow is not so easy as imaged.

"There is an issue that has troubled me for days. When I open the footage from my Sony PXW-X200 in Avid, there is messgae shows that the files are unrecognizable and Avid jumped out. I understand that Avid is incompatible with some 4K videos, however, I am never told that Avid can not afford Sony PXW-X200 XAVC files. Help!"

The XAVC format is not natively supported by Avid Media Composer, neither nor other editing software, like Final Cut Pro, Final Cut Express, iMovie, Sony Vegas Pro, Adobe Premiere Pro, etc owing to its high compression rate and heavy codec. So if you want to edit Sony PXW-X200 XAVC files in Avid, the first step is to transcode Sony PXW-X200 XAVC files to Avid native format-DNxHD MOV.

According to users feedback and experiences, you may like to give a shot to this powerful Mac App-Brorsoft Video Converter for Mac. With its intuitive interface, you can easily encode Sony PXW-X200 XAVC to DNxHD MOV for Avid without quality loss. Besides Avid, it also can help users to smoothly import and edit XAVC clips in various non-linear editing systems (NLE), including Adobe Premiere Pro, iMovie, Final Cut Pro, Final Cut Express and more. If you are a PC user, then Brorsoft Video Converter is your first choice. Now, download the software and start conversion journey.

Tutorial on converting Sony PXW-X200 XAVC to Avid in simple steps

Step 1. Launch the XAVC to DNxHD Converter on your Mac, then click the adding button to import your XAVC flies from HD drive or your camcorder directly.


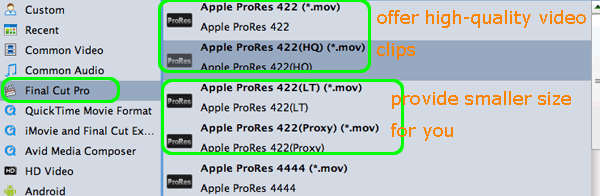
Step 2. Click "Format" bar to select Avid Media Composer->Avid DNxHD(*.mov) as the best video format for editing sONY XAVC in Avid with good video quality.


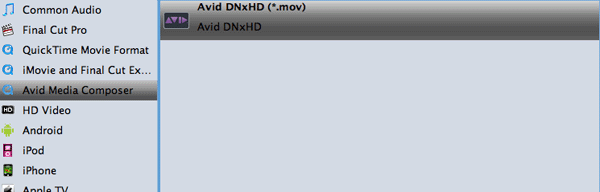
Tip: Before conversion, you can click "Settings" button right besides "Format" and enter "Profile Settings" panel to adjust video size, bit rate, frame rate, sample rate and audio channels.

Step 3. Hit "Convert" button and your files will be converted into DNxHD .mov files for Avid Media Composer. Now you can edit the encoded Sony PXW-X200 XAVC video files in Avid Media Composer without problem.

Read More:
Transcode Sony XAVC to Adobe Premiere Pro CC
Can't import XAVC into FCP- Convert XAVC to ProRes
Transcode XAVC to ProRes 422, 4444 for Final Cut Pro
How to import MOV to Premiere Pro CC/CS6/CS5/CS4
Sony PXW-X200 XAVC to Adobe Premiere Pro Best Workflow
How to import 4K XAVC from Sony PXW-FS7 to Avid Media Composer

Sunday, November 16, 2014

Sony FS7 4K Shooting to FCP 7-Edit Sony PXW-FS7 XAVC video in Final Cut Pro 7/X with ProRes mov

Have some videos shot with a Sony PXW-FS7, but Final Cut Pro 7 does not recognize the XAVC format. If so, follow the easy workaround here to solve Sony FS7 to FCP 7/X issues.
The PXW-FS7 has a Super 35 CMOS sensor, E-mount (which is great as you can use an adapter like Metabones for your EF lenses for example), and the big thing of course is that it shoots 4K UHD (3840×2160) internally on the very robust Sony XAVC codec, which uses a true 10-bit 422 codec color sampling. The camera can do 1080p up to 180fps internally, which is a huge deal. We’ve been told this is going to be continuous and not in burst mode as in the FS700, which contrary to the fact, is not being discontinued. The PXW-FS7 will be getting 4K DCI (4096×2160) as a firmware update in early 2015.

Can I load Sony FS7 4K footage into FCP X on Mac? If you are FS7 users, maybe you have this question. The answer is "No". Don't worry about this. This guide will show you two ways to import and edit Sony FS7 XAVC recordings in FCP X.

To import Sony PXW-FS7 XAVC footage to Final Cut Pro X or FCP 6/7 for editing smoothly, the easy workaround is to rewrap and convert XAVC to Apple ProRes, which ensures maximum editing quality and efficiency when working with Final Cut Pro. It’s a great way to achieve your goal smoothly.


The quick workaround is to use the easy-to-use yet professional app Brorsoft Video Converter for Mac which can be used as the best 4K video converter under OS X Mavericks(10.9), Mountain Lion (10.8), Lion (10.7), Snow Leopard (10.6), Leopard (10.5). With it, you can effortlessly transcode XAVC and XAVC-S to ProRes for Final Cut Pro 6/7/X as well as Apple InterMediate Codec for iMovie, DNxHD for Avid Media Composer, MPEG-2 for Adobe Premiere Pro.
Note: If you are also a FCP X user, before you try to do the conversion, don’t forget to make sure that you have installed the Apple ProRes Codec manually.

Now learn how to transcode Sony FS7 XAVC to ProRes MOV in detail.

How to Open Sony PXW-FS7 XAVC videos in FCP 7

Step 1: Launch the Sony XAVC to FCP Converter. Click "Add" icon to load video files from Sony PXW-FS7 or directly drag&drop the files into file list.


Step 2: Click the "Format" bar and select Final Cut Pro> Apple ProRes 422(*.mov) as output format, which should work with FCP 7 perfectly.


Tip: If you wanna, you can go to the "Settings" page to customize proper video/audio parameters including Video size, bitrate and fame rate and more.

Step 3: After all necessary settings, hit the convert button to start the Sony PXW-FS7 XAVC to ProRes conversion on Mac OS X. Once the conversion process shows 100%, click Open to get the output videos. Now you can edit the encoded Sony PXW-FS7 XAVC videos in FCP 7 without problem.

Read More:
How to Rip and Put a DVD movie on Nexus 6
Guide: How to downscale/convert GoPro 4K to 1080p
Work Panasonic GH4 4K MOV/MP4 with Premiere Pro CC/CS
GoPro Hero4 4K MP4 files to Adobe Premiere Pro best workflow
Convert Panasonic GH4 4K MOV/MP4 and Full HD video to Mac
Transcode Nikon D750 H.264 MOV clips to Windows Movie Maker

Thursday, November 13, 2014

GoPro Hero4 Workflow: 4K MP4 to Adobe Premiere Pro

Summary: If you have any issue when importing GoPro Hero4 4K MP4 files to Adobe Premiere Pro, just follow this simple guide, which offers you a quick fix for the problems with GoPro Hero 4 footage and Premiere Pro.


GoPro Hero4 is the most advanced GoPro yet. Featuring improved image quality and a 2x more powerful processor with 2x faster video frame rates, HERO4 Black takes Emm Award-winning GoPro performance to a whole new level. Incredible high-resolution 4K30 and 2.7K50 video and high frame rate 1080p120 video enable stunning, immersive footage of you and your world. The point here, you will find it a painful experience to upload GoPro Hero4 4K to Adobe Premiere Pro. And there're some frequently asked questions quoted as below.

Q: Hero 4 footage in Premiere Pro CC
Has anyone out there been editing footage from their Hero 4 in Premiere Pro CC? I have not been able to get clean playback in Premiere Pro CC, it's always choppy. I was wondering if anyone else is having this issue or if anyone is getting clean playback. This is a question specific to Premiere Pro CC, thanks.

Although Adobe Premiere Pro is compatible with MP4 format, a compressed output H.264 .mp4 from GoPro Hero4 is not ideal for editing. What’s more, Adobe PP CS6, CC can handle 4K files without much problem, but it is extremely hardware intensive. When you tried to load some 4K MP4 files from GoPro Hero 4, you will find it’s hard work. To solve those problems, the quick workaround is to transcode GoPro Hero4 MP4 files to Adobe Premiere natively supported formats. Along with some help from third-party software, it can be done effortlessly. Here I share a simple guide on how to convert GoPro Hero4 4K files for editing in Adobe Premiere Pro smoothly. If you’re facing the issues, read on to find the answer.

First you need to download Brorsoft Video Converter for Mac. Overall, the program is the best Mac Video Converter for GoPro Hero4 footage, which will create an Adobe Premiere Pro friendly file format- MPEG-2 keeping the original quality in OS X Mavericks, Mountain Lion and more. Besides Premiere, this software can also export professional encoders like DNxHD for Avid, ProRes for Final Cut Pro, AIC MOV for iMovie and more. For Windows users, Video Converter is the alternative choice. Just download it and follow the tutorial below to get the work done.

Guide: GoPro Hero4 4K MP4 files to Adobe Premiere Pro best workflow

Step 1: Add GoPro MP4 videos

Install and launch the GoPro Video Converter, and then click "Add Files" button to import your GoPro Hero4 4K clips to the software.

Tip: If you wanna combine GoPro MP4 video clips into one file, you can click the "Merge into one" box.


Step 2: Choose output format

Click "Format" pull down list to select Adobe Premiere/Sony Vegas> MPEG-2(*.mpg) as the best video format for Premiere Pro. WMV, MOV formats are the good choice as well.


Step 3: Convert GoPro Hero4 video to Premiere Pro

Click the Convert button under the preview window; the converter will start encoding GoPro Hero4 4K MP4 for importing to Premiere Pro.

Some more helpful features of the GoPro Hero4 Video Converter:

1. Settings- Click it to customize audio and video parameters Video Codec, bit rate, frame rate, Audio codec, sample rate, audio channels. We advise you to adjust the A/V parameters to be the same with source MP4 footage so as to bear least quality loss at proper file size. Of course, if you don’t stick with 4K video, you can downsize 4k to 1080p for easier editing on your computer.

2. Editor (next to "Add" icon)- Click to set watermark, trim, crop, add subtitles, etc.

3. If you want to smoothly edit GoPro Hero4 footage in Final Cut Pro X or FCP 7/6, you just need to choose the "Final Cut Pro > Apple ProRes 422 (*.mov)" as output format; For iMovie, select "iMovie and Final Cut Express -> Apple InterMediate Codec (AIC) (*.mov)" in the second step; For Avid Media Composer, choose "Avid Media Composer > Avid DNxHD(*.mov)" as output.

Soon after the conversion is finished, just click "Open" button to get the converted GoPro Hero4 footage for editing in Adobe Premiere Pro CS5/CS6/CC perfectly.

Related posts:

How to Rip and Put a DVD movie on Nexus 6
Guide: How to downscale/convert GoPro 4K to 1080p
Convert FS700 50/60 fps AVCHD clip to Final Cut X/7
Work Panasonic GH4 4K MOV/MP4 with Premiere Pro CC/CS
Convert Panasonic GH4 4K MOV/MP4 and Full HD video to Mac
Edit Blackmagic 4k ProRes videos with Adobe Premiere Pro in Mac

Thursday, November 6, 2014

Video-Help: Editing Canon C100 footage in Adobe Premiere Pro flawlessly

This guide tells you how to transcode Canon C100 MTS files to Adobe Premiere Pro compatible MPEG-2 video for editing without any problem.

Canon C100 is not a new camcorder although, there are still many issues around it when users importing and editing its footage in NLEs. This page focuses on the Canon C100 to Adobe Premiere Pro workflow. If you are just facing the issues while editing Canon C100 MTS in Premiere Pro(no matter Adobe PP CS4/CS5/CS6/CC), read on to get the most efficient solution.

As you know, Canon C100 records at 24Mbps using an AVCHD codec for easy integration in existing production workflows. Although Adobe claimed that Premiere Pro CS5 and above offer much better native AVCHD support than its predecessor, there are still some video, audio codec problems while importing/editing AVCHD MTS clips in Premiere Pro. Plus, even the Adobe program can ingest your MTS files directly, it takes a long time for rendering. The best method to import C100 MTS to Premiere Pro avoiding any problems and saving time is to transcode Canon C100 MTS footage into a Premiere Pro most compatible format like MPEG-2.


To get the work done easily, here Brorsoft MTS/M2TS Converter for Mac, as the best video converter for Canon C100 is highly recommended. With it, you can transcode C100 .MTS to MPEG-2 for Premiere Pro, ProRes for FCP, AIC for iMovie/FCE…, which will save you both time and trouble. And all you need is to drag the result videos for playing & editing. For Windows user, please get MTS/M2TS Converter. Now the following article will show you how to transcode Canon C100 MTS to Adobe Premiere Pro editable format in detail.

Read More in this blog...

How to Convert MP4 to MPEG-2 for burning to DVD
Tips and Tricks for DJI Phantom 3 & 3DR Solo Smart Drone
Edit Canon G7 X Mark II MP4 files in Sony Movie Studio 13/12/11
Convert Sony NEX-7 60P .mts files for use in Final Cut Pro 7, FCP X

Steps to convert Canon C100 MTS videos to Adobe Premiere Pro MPEG-2 format

1. Import MTS to the converter

Run the MTS to Premiere Pro converter and click the Add Files button to import the MTS videos from C100 or hard drive to be converted. The converter supports converting multiple files at a time.


2. Choose the output format

Click "Format" drop-down bar to select a proper video format. To edit AVCHD videos in Adobe Premiere, then Adobe Premiere/Sony Vegas > MPEG-2 (*.mpg) is the suitable one.


3. Start C100 MTS conversion with a click

Hit the big Convert button on bottom of the main windows and the conversion from Canon C100 MTS to MPEG-2 for Adobe Premiere Pro will begin immediately.

Tips:

1. Adjust audio and video settings

The best MTS to Premiere Pro Converter enables users to adjust audio and video settings before transcoding AVCHD files to MPEG-2. Click "Settings" button, then you will enter the following interface, on which you are allowed to customize size, bit rate, frame rate, sample rate, and audio channel to your required ones.


2. Basic video editing (optional)

This Mac MTS converter enjoys a built-in video editor, so you can touch up the video with basic video editing functions. The supported video editing operations are: Trimming, cropping, appending artistic visual effects, adding watermarks and load subtitles to the videos. Just note that this step is skippable if you want to keep the original video effects.

Once the conversion done, you can click "Open" button to get the output files effortlessly. Now you have got it right, just to import and edit Canon C100 MTS with Adobe Premiere Pro CS4/CS5/CS6/CC at ease.

Related Guides:

How to attach and add subtitles to MP4 movie
Plex Media Server doesn’t play MP4 file- Solution
Tips Playing GoPro Hero 4k/1080p files on iPhones
Transcode MKV to Windows (Live ) Movie Maker
Deinterlacing 1080i video files for Vimeo/YouTube
Import Pentax K-3 h.264 videos to FCP/iMovie/FCE
Sony HDR-MV1 to edit in Final Cut, Adobe Premiere Pro
Editing Pentax K-S1 H.264 format videos in Premiere Pro
Best Solution to Import and Edit DVD in Premiere Pro CC/CS6
Rip Blu-ray/DVD to MKV Losslessly with MakeMKV Alternative
Sony HDR-MV1 1080P mts import to FCP 7/X and Premiere Pro CC
Convert Sony A5100 XAVC S/AVCHD/MP4 to FCP/iMovie/FCE format