Thursday, August 27, 2015

Problem Uploading Video Clip AVI files to YouTube Sharing

If you're having trouble uploading AVI videos to YouTube, try to read this article to find out the best solution.

"Hi dear folks,
I am having problem to upload video clip avi file to YouTube; and after selecting the video clip when I click the upload button; I had to wait more than the expected time but it was not working at all.
Thanks"

Well, you should know something first, YouTube only supports sharing video in several formats, i.e, you can't upload your video in incompatible formats to YouTube. It's stated by YouTube that MP4 is the best format to use. It provides better quality than FLV and is not as heavy as AVI. WMV HD format seems to lose its quality while 3GP and SWF resolutions are too small.

AVI is a container format. The video and audio streams stored in different AVI files may be encoded in different ways. However, YouTube just only recognizes the specific way that the audio and video streams of AVI files are encoded in. If your videos aren’t in the compatible video formats? Don’t worry. You can free download video converter software to convert video to YouTube recognized video formats on both Mac (OS X 10.11) and PC (Windows 10).


To do this, an AVI video converter and editor is needed. Luckily, Brorsoft Video Converter just meets your needs. It specializes in converting videos among various formats like MKV, FLV, MP4, WMV, VOB, MPEG, AVI, etc. With it, you can fast change the AVI format to YouTube FLV. What's more, before converting your movies, you can use the built-in video editor to trim the videos into multiple segments with short duration and personalize the videos to achieve a better overall effect. If you want to upload AVI files to YouTube on Mac, please turn to MKV Converter for Mac. Now just download the program and check out the steps below.

Download the best AVI to YouTube converter:

(Note: Click here for OS X 10.5)

How to convert AVI to YouTube format

Step 1. Import AVI files

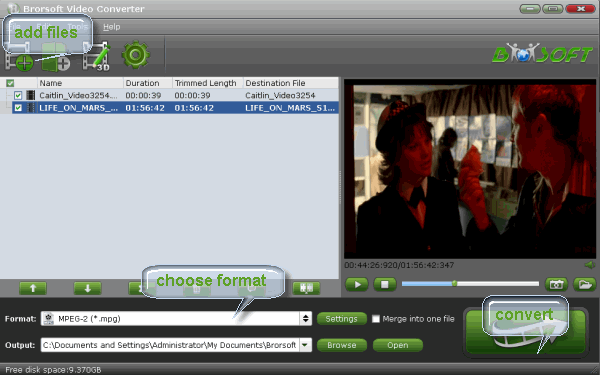
Lunch the AVI converter; drag & drop AVI files to it. Or click the Add video button to locate the files you want to add. Note that batch conversion is supported so you can add as many files as you like at one time.


Step 2. Select output format

Click Format bar to select an output format. To share your AVI movies on YouTube, .avi, .3gp, .flv, .mov format from Common Video are all the proper formats. You can also press the Settings button to adjust the video size, bitrate, frame rate, audio sample rate, etc to optimize the quality.


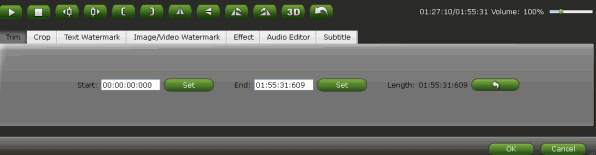
Step 3. Trim/Split AVI video

YouTube has limitations about the uploading video size and length. Here we should highlight the trim function on this software. Just click "Edit" to trim the AVI videos to get the very part you want. Besides trimming, cropping, adding watermark, adjusting special effect, are well supported as well.


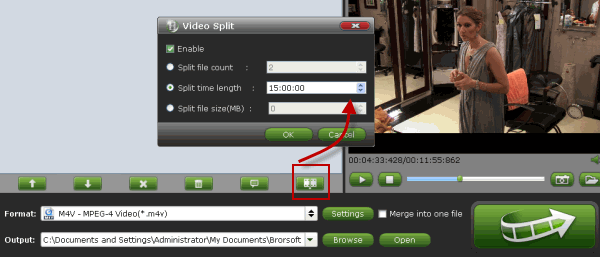
Tip: If the video clips you've trimmed are still longer than 15 minutes, you can choose to split the long AVI video into smaller parts so as to share on YouTube without limit. Click the Split icon in the main interface, and you can cut your files according to time length and file size.


Step 4. Start the conversion

Click "Convert" button to start converting AVI video for uploading to YouTube. After the conversion, click "Open" button to get the exported files and then upload the converted AVI files into YouTube for sharing with your friends, families, and fans.

Related Guides:

AVI to Adobe Premiere
AVI to After Effects
AVI to Pinnacle Studio
AVI to Avid Media Composer
AVI to Windows Movie Maker
AVI to Sony Movie Studio
AVI to Sony Vegas Pro
Convert SWF to FCP/iMovie/FCE supported editing formats
Convert H.265 4K to Ultra HD TV for playback
Import Nikon D7000 h.264 mov videos to FCP on Mac OS X

Monday, August 17, 2015

Most Efficient Way to Edit Blackmagic 4K ProRes, DNxHD MXF in Cyberlink PowerDirector 10/11/12/13

This tutorial will help you edit BM (Blackmagic) footages ( DNxHD MXF, ProRes 422 MOV, QuickTime MOV, H.264 MP4 )in Cyberlink PowerDirector 10/11/12/13 on Mac OS X ( El Capitan & Yosemite included).

I use Cyberlink PowerDirector to process all my Video files because it is much faster than AVID, Premier, or Vegas.

Question 1 :

"We are using a BlackMagic studio camera and recording ProRes to SSD (HyperDeck)

Will Cyberlink PowerDirector capture/import, etc. this format for editing.

Thanks. "

Question 2:

"Does anybody have experience in this:
I am planning to use Blackmagic 4k camcorder, and need to choose between Apple ProRes and DNxHD codec for output. Can either of these codecs be imported to PowerDirector 10 or 11 - and then edited there and finally output to any format PowerDirector supports ? If not, is there any workaround?

No worries, in the following pages, i will introduce you the best workaround to encode Blackmagic DNxHD MXF, ProRes 422 MOV, QuickTime MOV, H.264 MP4 to Cyberlink PowerDirector for editing.

To solve the issues, you need to convert Blackmagic 4K video to MPEG-2 for Cyberlink PowerDirector as primary delivery format. The process is surprisingly easy and can be done with the help of Brorsoft Video Converter for Mac. With it, you can effortlessly encode/re-encode Blackmagic 4K footage for smoothly importing and editing in various non-linear editing systems (NLE), including Adobe Premiere Pro, Avid Media Composer, Final Cut Pro, iMovie, FCE and more. If you work Blackmagic 4K files in PD on Windows, please get Brorsoft Video Converter. Below is the detailed guide on transcoding Blackmagic 4K files to PowerDirector friendly video formats.

PS: Refer to 4K Workflow column to get all-round solutions and workflows to play, edit, convert and share 4K Ultra HD videos in Windows/Mac.

Download Blackmagic 4K Video Converter:

(Note: Click here for OS X 10.5)

Converting Blackmagic 4K files to Cyberlink PowerDirector 10/11/12/13

Step 1: Import source 4K videos

Run 4K to Premiere Converter for Mac and click "Add Video" and load your 4K video files into it. It also supports joining several videos into a single file.


Step 2: Select the output format

Click the Format bar to select output format- Adobe Premiere/Sony Vegas > MPEG-2 (*.mpg) for editing raw 4K in PD with natively supported video codec. Of course, you can also choose MPEG-4, WMV from “Common Video” as the output format.


Tips: Click "Settings" button if you'd like to customize advanced audio and video parameters like Video Codec, aspect ratio, bit rate, frame rate, Audio codec, sample rate, audio channels. If you want to get original 4K resolution, just keep the video size as original.

Step 3: Start converting 4K footage

Click the "Convert" button to start the Blackmagic 4K ProRes to MPEG-2 conversion.

When the conversion is finished, you can click "Open" button to get the generated MPG files effortlessly. Launch Cyberlink PowerDirector on your computer, choose "File > Import to import converted Blackmagic 4K files in PowerDirector 10/11/12/13 for further editing.

More Topics:

4K Ultra HD Video Converter
4K workflow with FCP
4K workflow with Premiere
4K workflow with Sony Vegas
How to Attach Subtitles into AVI video files
Convert SWF to iMovie on Mac(Yosemite/Mavericks)
Ripping DVDs to Lenovo Tab 2 A10/A8 with best quality
Play DVD movies on Lenovo Tab 2 A10 Android Tablet
How Can We Rip DVD to Lenovo Tab 2 A8 Easily
Upload FLV to iTunes for playing on iPhone, iPad, iPod, ATV
Encode Sony/Canon MTS/M2TS to PowerDirector compatible format

Monday, August 10, 2015

C300 Mark II 4k Workflow Guide on Premiere Pro CS6/CS5/CS4 to import EOS C300 MK II XF-AVC/H.264 MXF files

If you are looking for an easy and direct way to import and edit Canon C300 Mark II XF-AVC 4K/1080p files in Adobe Premiere Pro CC/CS6/CS5, you may wish to read this post. It guides you through the process of converting Canon C300 MK II XF-AVC/H.264 MXF files to MPG/WMV for editing in Adobe Premiere Pro CC/CS6/CS5 with excellent quality.

Canon EOS C300 Mark II uses Canon's new XF-AVC codec to record video files and package them in an .MXF wrapper. The XF-AVC uses the MPEG-4 AVC/H.264 video compression format, efficiently recording 4K, 2K and HD video to regular memory cards while achieving a high data compression rate and preserving image quality, which is much difficult for Premiere Pro CC, CS6, CS5 to recognize and support.

If you accidentally meet with the problem, the best solution is to convert MXF to MPEG-2, the format which is proved to be the most compatible one with all the Adobe products, including Adobe Premiere Pro CS6. The most important part is how to find out the best MXF Converter among so many options on Google and Bing.


Brorsoft MXF Converter for Mac is best choice to get the work done. It lets you transcode 4K MXF to MPEG-2, Apple InterMediate Codec, Apple ProRes, DNxHD and more. This is a smart tool specially designed for MXF users to preview and convert 4K, 1080p MXF recordings to your wanted video and audio formats, so as to smoothly add them into Adobe Premiere Pro, iMovie, FCE, FCP, Avid Media Composer to do further editing. If you have MXF editing issues on Windows PC, get the MXF Converter to solve the problem.

Full Guide: Encode Canon C300 Mark II 4K XF-AVC/H.264 MXF to Premiere Pro CC/CS6/CS

Step 1: Add MXF files to the converter

Launch Brorsoft MXF Converter for Mac, and click the “Add Files” button to load 4k or 1080p .mxf videos for converting.


Step 2: Choose Premiere friendly format

Click “Format” bar and then move your pointer Adobe Premiere/Sony Vegas –> MPEG-2(*.mpg) as target format. Besides, you can also choose WMV (VC-1) (*.wmv) if you want to get a relatively smaller output file.

PS: You also can click “Settings” to set video frame rate, video size and Video Bitrate as you want.

Step 3: Start Canon C300 MK II MXF conversion

As soon as all things are finished, please click “Convert” button to start the Canon C300 Mark ii MXF to Premiere Pro conversion on Mac OS X.

Once the conversion is 100% completed, you can copy the converted Canon C300 MK II (4K) files to Premiere Pro CC/CS6/CS5/CS4 with smooth workflow.

Additional Tips:

This versatile MXF to Premiere Pro Converter allows you to convert MXF video to kinds of NLEs; just choose a proper output format. If you want to edit MXF media in Final Cut Pro, please choose the “Final Cut Pro > Apple ProRes 422 (*.mov)” as output; For iMovie or FCE 4, choose the “iMovie and Final Cut Express -> Apple InterMediate Codec (AIC) (*.mov)”. For Avid MC, choose “Avid Media Composer > Avid DNxHD(*.mov)”.

More Guides:

Convert MXF to MOV
Convert MXF for Mac editing
Convert MXF to AVI/WMV/MPEG
Canon XF Plugin for Final Cut Pro (X)| FAQs & Answers
How to Convert Canon MXF for Sony Vegas further editing
How to Transcode Canon MXF to DNxHD for Avid Media Composer

Tuesday, August 4, 2015

Simple way to Transfer DVD disc to Nokia NI for Entertainment

Summary: Wanna enjoy DVD movies on Nokia NI? This tutorial will teach you how to put DVDs on Nokia NI smoothly.

Nokia has made a surprise comeback into the world of consumer tech devices with the launch of its new Android tablet, the Nokia N1. The N1 runs Android Lollipop version, which is the latest build of the OS and features a 7.9-inch screen. Such design is concerned as an outstanding feature for playback movies. This tutorial will teach you how to open DVD movies on Nokia NI for entertainment.

Android accepts various video formats H.264, MPEG4, WMV, AVI, MOV, 3GP, etc. However, it cannot play DVD discs directly since there is no DVD-Room equipped. Thus the essential thing we need to solve is that how to make Android tablet accept DVD discs directly. The best solution here is to rip DVDs into MP4 format with a powerful third party program.

Brorsoft DVD Ripper would be the best one that will satisfy you with its strong DVD ripping abilities and fast ripping speed. It can rip DVD to Nokia NI or other Android Tablets like HTC pads, Samsung Pads, Google Pads, and Lenovo Pads for keeping high video quality of original DVD disc bypassing CSS encryption, region code, Sony ARccOS, UOPs, APS, RCE, etc. If you are a Mac user, pls turn to Brorsoft DVD Ripper for Mac. Now, download the software on computer and follow the guide below to start conversion.

How to Encode DVDs into MP4 for Nokia NI playback

One: Insert your DVD into DVD driver, and click the "DVD" icon on the top of the software to load DVD movie. ISO and IFO files are also supported.


Two: Select an Android friendly format, e.g. H.264 .mp4 for conversion. Basically the "Common Video -> H.264 Baseline Profile Video (*.mp4)" is an universal format for Android tablets and smartphones. Besides, there are a lot of optimized formats for other Android devices in "Format" column.


Tip: If you think the output parameters are not fit for your Android Tablet or Phone, you can adjust manually in "Settings" page.

Three: When all the settings are OK, click "Convert" button to start converting DVD movies to MP4 video for playback on Nokia NI at ease.

When the conversion completes, you can click "open" panel to locate the ripped video files. Now, it is easy for you to enjoy DVD movies on Nokia NI after transferring movies to Nokia NI via a USB device.

Read More:
How to transfer DVD to iTunes
How to Play DVD on Nexus 9
How to Watch DVD movies on Zenfone
Play Blu-rays & DVDs on Kindle Fire HD 6
Enjoy DVD, ISO movie file on Kindle Fire HDX 8.9
Convert Blu-ray/DVD to Transformer Book Flip TP550LA