Wednesday, March 30, 2016

Copying 3D Blu-ray movies to View on Archos VR Glasses

Go with the following pages to enjoy 3D Blu-ray movies on Archos VR Glasses in 3D MKV/MP4 formats.

Source From: How to Play 3D Blu-ray movies on Archos VR Glasses

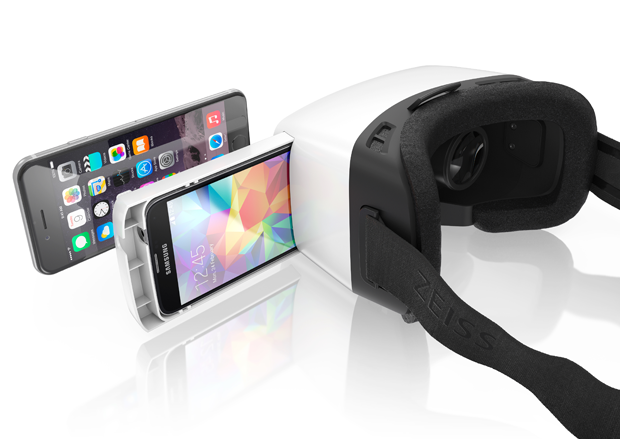
Archos VR Glasses, a wonderful virtual reality headset released by Archos technology company. With your existing smartphone as screen and engine, you can step into a deep 360° world where your can fly, visit imaginary world and explore the ocean floor from the comfort of your sofa. Against the other rivals, Gear VR, VR One, Google Cardboard..., the biggest highlight is its powerful compatibility: made to work with the majority of smartphones from any brands. Instead of going to theater to experience an immersive 3D environment, you can also get all your 3D Blu-ray videos to Archos VR headset for watching with 3D effects. Back to the point, how can we play 3D Blu-ray videos on Archos VR Glasses?


As you know, Archos VR Glasses doesn't have Blu-ray drive support playing 3D Blu-ray movies, that's to say, you have to do extra work to rip the 3D movies off from Blu-ray disc at first. And then you also need to change 3D Blu-ray to 3D SBS MP4 or MKV video format for playing on Archos Video Player app with 3D effects. It may sounds a bit complicated but all this can be easily fixed with the help of Brorsoft 3D Blu-ray Ripper, which an perfect combination of ripper, converter and editor.

After applying it, you can easily rip any commercial and region-locked 3D Blu-rays to 3D MP4/MKV for Archos VR Glasses as well as Gear VR, Oculus Rift DK2, Oculus Rift DK2, or other popular VR devices. What's more, it can also rip 3D Blu-ray to optimized video for playback on iPad Air, iPad Mini, iPhone 6/6 Plus, Samsung Galaxy Tab, Galaxy S6/S6 Edge/S5/S4/S3/S2, Zune, Archos, iRiver, Blackberry, Xbox 360 and more. If you are a Mac user, you can turn to Brorsoft Blu-ray Ripper for Mac (El Capitan, Yosemite included), which has the same function as the Windows version.

Guide: Ripping 3D Blu-ray for Watching on Archos VR Glasses

1. Add 3D Blu-ray movies

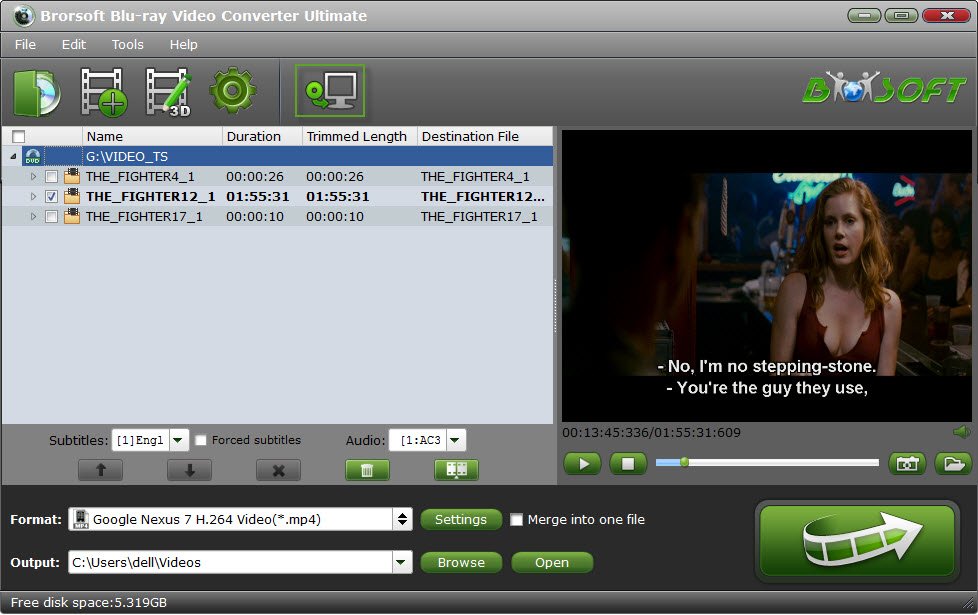
Insert the Blu-ray disc into external Blu-ray drive and launch the 3D Blu-ray ripper. Click disc button to add the 3D Blu-ray files. At the bottom, you can select your desired subtitle and audio track. And by clicking Edit, you can trim, crop videos, adjust video effects, add watermarks, etc.


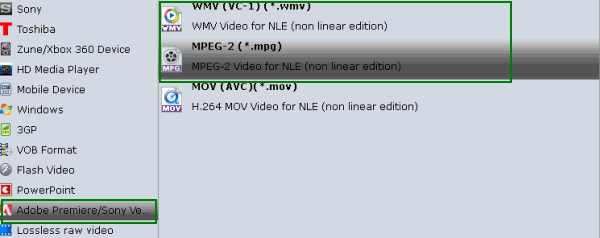
2. Choose output profile

Click "Format" to select an output profile. Here you can follow the path "MP4 Side-by-Side 3D Video (*.mp4)" for ripping Blu-ray to side-by-side 3D MP4 video.


3. Advanced Video/Audio settings

Click "Settings" button to do corresponding settings regarding to video, audio. Plus, you can also select 3D Anaglyph like Left/Right mode.
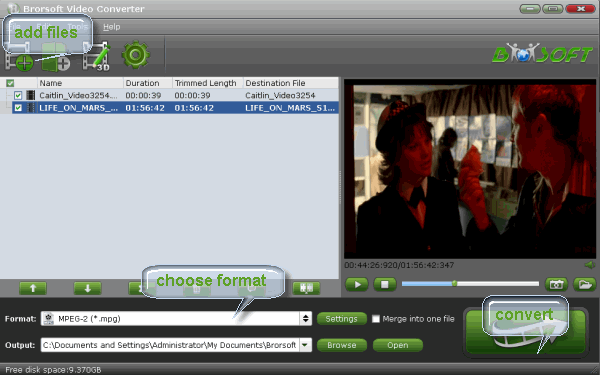


4. Start conversion

Hit the Convert button; this video converter will start to convert 3D Blu-ray to SBS MP4 files. After the conversion is over, connect the USB drive with computer and head to the destination folder where the converted files are stored and get them to Archos VR headset for enjoyment using its Archos Video Player app without any hassles. Now, just enjoy.

More Topics:

Copy Blu-ray to iTunes
Convert Blu-ray to Plex
Copy Blu-ray Full Disc
Rip Blu-ray to 1080p DivX AVI
Recover iPhone Files Tips and Tricks
Enable iPhone to Read/Play MTS files
How to convert YouTube videos to iMovie
How to Add YouTube Videos into PowerPoint
Some Recovery useful Tips You Should Know
Top 5 Best DVD Ripping Program Review 2016
Import YouTube videos to Windows Movie Maker
Best Software to Convert MTS/M2TS to MP4 on Mac
How to rip DVD to all popular video and audio format
Ripping Blu-rays for Enjoy Blu-ray movies anytime and anywhere
Workflows to play, edit, convert 4K Ultra HD videos in Windows/Mac

Thursday, March 24, 2016

Converting Between AVI and MOV, Convert AVI to Quicktime MOV (El Capitan included)

This article introduces a smart AVI to MOV(Quicktime) converter to convert AVI to MOV with ease and efficiency for playback in QuickTime or entertainment on iPhone etc.

"I have been given some h264 video files in .avi format and wanna to convert these to .mov by resaving them out to .mov from QuickTime Player 7, any suggestions? "

AVI (Audio Video Interleave) is a commonly used video format that is supported by most video players in Windows platform. However, there are few Mac video players supports AVI playback. If you want to edit AVI in iMovie, or playback these files on your iPad, iPod, or iPhone, etc. Apple products, you can convert AVI to MOV on Mac OS X (Mavericks). The reason is that MOV files are compatible with Mac OS While AVI file can't do such a good job compared to MOV.

To solve this problem, you need to get some help from third-party program. There are many kinds of Mac video converter softwares on Market. One highly recommended program is Brorsoft Video Converter for Mac, which is the right one Mac AVI to MOV Converter. It can convert not only AVI files on Mac, but also MKV, MP4, WMV, M2TS and FLV, etc. It also provides powerful editing functions and gives a full support to Mac OS X Mountain Lion and Mavericks.

If you're using a Mac, you can just get the equivalent Windows version - Brorsoft Video Converter for Windows, which can convert AVI to QuickTime MOV in Windows (Windows 8) easily and quickly.

Source From: How to Convert AVI to MOV on Mac OS X with ease

(Note: Click here for OS X 10.5)

How to Convert AVI to MOV on Mac OS X with ease

1. Load source AVI videos

Launch the Video Converter for Mac, and you may either click "Add" button to import .avi files, or directly drag and drop the files into this program. If you'd like to combine multiple AVI files to be a single file, you can tick the checkbox "Merge into one file".


2. Select output format

This AVI to QuickTime Converter offers the QuickTime Movie Format for you. Or, you can also choose "Common Video -> MOV - QuickTime (*.mov)" as the target format.


Tip: To make good control of the output file size and quality, you can adjust all the items in the following interface, including codec, bit rate, frame rate, sample rate, and audio channels. To bear least quality loss, you may set A/V parameters according to the source AVI files.

3. Start transcoding AVI to QuickTime MOV

Finally, press the convert button; it will start to convert AVI files to QuickTime friendly video format immediately.

After the conversion completed you can click on "Open" button in the main interface to get the generated files and load the video to QuickTime player effortlessly.

P.S. If you want to try "hit and miss", Perian, a great open-source QuickTime component, which rolls several codecs into one package, might work.

Important Note: Perian is no longer under development and does not work with QuickTime 10 or above. (It still works with QuickTime 7.6.6.) Plus, note that not all codecs for the various .avi movies are available for QuickTime. So, what we highly recommend is to convert AVI to QuickTime for smooth playback.

More Topics:

Play AVI via Plex
Add Subtitles to AVI
Play AVI on OS X Yosemite
AVI to Windows Movie Maker
Merge multiple AVI movies into One File
Change MKV to high quality AVI or other
Transcode Divx/Xvid AVI to DaVinci Resolve 11
Steps to convert VOB to MKV with zero quality loss
Can't Import some .avi video files into Pinnacle Studio
How to Convert AVI to MPEG for Vegas Pro 8/9/10/11/12
Convert AVI to MPEG for Sony Vegas Pro 8/9/10/11/12/13
Convert Video_TS folder to play on Android devices with ease

Monday, March 21, 2016

Best workflow to Coombine many VOB video files together

Summary: Want to join multiple VOB video files? This article aims to show you two ways to assist you merge many VOB video files together into one.

After ripping a DVD disc, you are likely to get many VOB video files that conatin different audio and video materials. In order to watch them without any interruptions, chances are you want to combine them together into one file. If so, you won't miss the below article on offering two effective methods to help you join multiple VOB video files. You can choose the one according to your preference.

Solution 1: Using DVD Decrypter

DVD Decrypter in IFO mode has an option to combine all the VOB files for a program into a single large VOB file when they are copied to the hard drive. Since a program like DVD Decrypter is a good way to transfer VOB files to your hard drive, this is probably a way of creating a single large VOB file.

Note: It only works for the VOB files that still contained in a DVD structure. If you have a pile of single VOB files on HDD, the second solution is preferable.

Solution 2: Using a solid VOB Joiner

To merge VOB files together, you also can ask a reliable VOB joiner for help. And Brorsoft VOB Joiner is your best choice, which a perfect integration of video joiner, video converter and video editor.

With this fabulous program, you can join multiple VOB videos flawlessly in a very short time and retain the original quality of the videos for watching smoothly. Apart from VOB, you can also merge many other formats such as MP4, AVI, WMV, MOV, MKV, FLV, MTS, MPG, etc and then effortlessly convert them to virtually all types of video formats including AVI, MKV, FLV, F4V, MOV, MTS, MXF, VOB, TiVo, DVS-MS, WDT and more with fast speed and excellent video quality. More than that, this splendid gadget also boasts itself a brilliant editor for offering some practical editing functions like splitting, embedding watermark, attaching subtitles, adding special effects, etc. If you want to join VOB videos on Mac, VOB Joiner for Mac is the alternative. Now, download and install the VOB joining software. Just follow the step-by-step tutorial.

How to Join VOB files into one without any hassles

1. Import video files

Launch the program and click the add button to import the .vob files.


2. Advanced Settings

Select the output file location, format and set the necessary parameters (frame rate, codec, video size, etc). You can also click Edit button to trim, crop, add special effect or attach subtitles to your videos.

3. Merge multiple VOB movies

Check "Merge into one file" at the bottom under the preview window.

4. Start joining VOBs

Click the big Convert button to start merging VOBs into one file immediately with the top Video Joiner software. As soon as the conversion is done, simply click "Completed" to back to main interface, and click "Open" button to find generated videos.

More Topics:

VOB to MOV
VOB to MP4
VOB to DivX
VOB to iTunes
How to merge MKV files into 1 single file
Merge multiple AVI movies into One File
Mix several MP4 files into One for Playback
Smoothly Join MOV files into One for Playback
Can't Open an AVI file in Windows Movie Maker
Best way to join multiple FLV files into a large one
Upload a .mp4 file into two separate parts on Facebook
How can i convert H.265 to 1080P H.264 Encoded Video
How Can I Open MP4 videos on Sony Vegas 13/12/11/10
Convert video to M3U8 with this free and fast online converter
Import Sony 4k XAVC (S) footage into Premiere Pro CC/CS6/CS5/CS4

Tuesday, March 15, 2016

How to deal with 4k Videos from DJI Phantom 4 in Final Cut Pro 7/X

All of our Mac users can learn how to convert DJI Phantom 4 4K video to ProRes 4K for editing in FCP in the following page.

The Phantom 4 is a beautifully designed camera drone. Its smooth curves and crisp white exterior make it a natural fit for Apple stores, where its being sold exclusively for the first few weeks.

Aerial footage really is this drone's strength. The onboard camera shoots 4K footage at 30 frames per second and captures photographs at 12 megapixels. Shooting in 4K will fill up the onboard 16GB SD card in about 35 minutes, which isn't too much of an issue since each battery charge only lasts 28 minutes of flying-time anyway. From the sky, the drone streams 720p HD footage back to a smartphone or tablet attached to the remote control. Though there was the occasional lag if the camera made a sudden manoeuvre, the drone's-eye stream will let users see exactly the footage they're capturing and make any adjustments mid-flight.

If you recorded some videos by DJI Phantom 4, you may like me prefer editing the 4K video in Final Cut Pro. But, we can’t import DJI Phantom 4 4K to FCP directly due to the codec incompatibility. So here someone may asked: Is there any DJI Phantom 4k Video Converting Alternatives?


Brorsoft 4K Video Converter for Mac is highly recommended here. The program is an easy-to-use yet professional DJI Phantom 4 4K Converter for FCP. It's able to convert 4K MP4/MOV files to Final Cut Pro more compatible format ProRes 422 without quality loss. Plus, this 4K video app can also encode any 4K videos including XAVC/XAVC S, 4K MOV, etc to Avid Media Composer, iMovie, Adobe Premiere Pro. Just download it and follow the tutorial below to get the work done.

Download the best 4K Video Converter:

(Note: Click here for OS X 10.5)

Import DJI Phantom 4 4K files to Final Cut Pro 7

Step 1: Load DJI Phantom 4K footage

Run DJI Phantom 4K Converter Macand click “Add file” or “Add from folder” button, browse to the Phantom 4 4K MP4 footage and load them to the converter for conversion. You can check the “Merge into one” box to join several video files together.


Step 2: Select Apple ProRes as output format

Click the “Format” bar and select Final Cut Pro> Apple PreRes 422(*.mov) as output format.


Tip: Click the “Settings” button and set proper video/ audio parameters. You can reset set the video size, bitrate and fame rate. You can keep the original 4K resolution but also can adjust to 2K, 1080p video size just according to your needs. Usually 1920*1080 video size and 30fps video frame rate are recommended for FCP 7 editing.

Step 3: Start converting 4K MP4/MOV to ProRes

When you finish all settings, hit “Convert” button to start transcoding DJI Phantom 4 4K video for Final Cut Pro 7 on Mac. You can follow the conversion process from the pop-up windows.

After the conversion, it would be easy to import DJI Phantom 4 4K MP4/MOV files into FCP 7 for natively editing.

More Topics:

4K Downscaling to 1080p
4K workflow with Avid MC
4K workflow with Sony Vegas
4K Workflow with After Effects
Best 5 iPhone Data Recovery Tool for Mac OS X
Best Tool to Convert MTS/M2TS to MOV on Mac
Tricks for Downscaling DJI Phantom 4 4k to 1080p
Easy steps to convert and play M2TS/MTS files on Mac
Fix VOB Import Incompatible with Windows Movie Maker
Get Windows Movie Maker work perfectly with .mov clips?
Import MPG files into Windows Movie Maker ( Windows 10 )
Get Sony PMW-400 footage to work with Pinnacle Studio 15/16/17/18

Sunday, March 13, 2016

How do I split a .mp4 file in Windows, to make video files smaller?

"I'm trying to upload a .mp4 file into two separate parts on Facebook. Facebook only allows up to 20 minutes on a clip, and my video is 22 minutes. I'm trying to find a program which would split my mp4 videos, any ideas?"

Sometimes we want to split a long MP4 movie into smaller parts for easy storage, cut a short scene to send to our friends or trim it down to upload to Facebook. But how can we achieve that? All we need is a good MP4 splitter. Brorsoft Video Converter Ultimate is a professional MP4 video splitter to help us. It can split MP4 videos fast without losing any quality. You can use it to split MP4 files as well as videos in many other popular formats, like WMV, MOV, AVI, MKV, FLV, ASF, MPG, M2TS, SWF, WMA, MP3, OGG, AAC, FLAC, etc. In addition, this Video Editor has many other useful functions as well.

With it, you can personalize your videos with basic editing features like crop, rotate, merge, speed-up and slow-down and more. If you want to put your videos to the next level, you can further optimize the files with advanced functions. For example, you can apply eye-catching effects to the videos, insert stunning transitions to the scenes between clips, add customized watermarks to make the videos more expressive, etc.


It sounds very amazing, right? Let's have a try! Just download the program and follow the guide below, you'll find out how to split MP4files with ease.

If you are using a Mac, get the equivalent Mac version called Brorsoft iMedia Converter for Mac.


How to split a large MP4 video

Note: This guide uses Video Converter Ultimate for Windows (Windows 10 compatible) version screenshots. The way to split MP4 video files on Mac (10.11 El Capitan included) is the same. Just make sure you get the right version according to your situation.

1. Import the mp4 video files you want to cut into the video split tool.

2. Tap the Video Split button and enable the Video Split function. Now choose the way you want to split- Split file count; split time length; split file size.


3. Select the output file location, format and set the necessary parameters (frame rate, codec, video size, etc).

4. Click the "Convert" button to start splitting video files. After the process, it's easy to locate the split files in one video folder.

More Topics:

MP4 to iTunes library
MP4 to Pinnacle Studio
MP4 to Sony Movie Studio
MP4 to MOV/AVI/MKV/FLV
Merge multiple AVI movies into One File
How to Join VOB Files Quickly and Easily
How to merge MKV files into 1 single file
Upload XAVC files to YouTube for Sharing
How to Import TS files to Premiere Elements
Imoport MOV files to PowerDirector 11/12/13
How to Recover iPhone Contacts without backup
Smoothly Join MOV files into One for Playback
Best way to join multiple FLV files into a large one
Convert and Copy Blu-ray movies to iTunes Playback

Thursday, March 10, 2016

Convert and Split MKV files for Sharing on YouTube

The easy workaround to upload MKV files to YouTube is to convert and split MKV to YouTube compatible video. Here is how.

MKV file format stands for Matroska video, which become more and more common high-definition video , but it do not support by more portable device and websites like YouTube, Facebook, Yahoo, etc. If you want to share a video in mkv files with your friends through YouTube, you need to upload them to YouTube. Sometimes, YouTube won't allow me to upload .MKV files (matroska video). It is what YouTube says:"Sorry, that's not a video file that we support. We currently only support the following extensions."

Generally speaking, YouTube accepts video files in FLV, AVI, etc formats. So, in order to upload MKV to YouTube, the first thing you need do is to encode MKV to YouTube supported video formats.


Here Brorsoft Video Converter is a highly recommended tool to achieve the goal. With this MKV to YouTube converter, you can fast convert MKV videos to YouTube most compatible format like .avi, .3gp, .flv without quality loss. What's more, with the built-in video editor, it's freely for you to trim the MKV videos into multiple segments with short duration. The most important is that, it allows you to modify the video bitrate, frame rate, video size, audio channel, etc for your original MKV files for easier uploading. If you are working on Mac, please get Brorsoft Video Converter for Mac. Now I share the step-by-step solution converting/uploading MKV to YouTube.

P.S. Before uploading MKV video to YouTube for sharing with more guys, you can edit MKV in FCP X/Premiere/Avid or iMovie on Mac OS X to get your video to the next level.

(Note: Click here for OS X 10.5)

What are the correct basic steps to convert MKV files to Youtube?

Step 1: Import MKV files

Copy the MKV files to your hard drive. Drag & drop video files MKV to the program after launching it. Or click the Add video button to locate the files you want to add.


Step 2: Select output format

Click Format bar to select an output format. To share your MKV movies on YouTube, .avi, .3gp, .flv format from Common Video are all the proper formats. You can also press the Settings button to adjust the video size, bitrate, frame rate, audio sample rate, etc to optimize the quality.


Step 3: Edit/Split your movie

Click Edit button and you can trim, crop or adjust the video with the built-in video editor to get the very part and effect of the movie you want.


Trim - Choose to reserve the part you need. Just choose the chapter which you need to trim, to set "start time" or "end time", type the portion which you want to save.

Crop - Remove black edges of your video or just get the scale of this video you want.

Effect - Adjust the effects by adjusting the parameters, such as:

1) Deinterlacing - If there are some stripes on the picture, you can check this option to make a better picture effect. (Checked by default)

2) If you want to get 3D effect, just enable this function and do settings.

Tip: If the video clips you've trimmed are still longer than 15 minutes, you can choose to split the long MKV video into smaller parts so as to share on YouTube without limit. Click the Split icon in the main interface, and you can cut your files according to time length and file size.


Step 4: Start the conversion

After that, click Convert to start the MKV to YouTube conversion. When the conversion ends, you can tap the Open button to locate the converted files and then upload the MKV Video to YouTube simply.

More Topics:

Convert MKV to MOV
Convert MKV to iTunes
Import MKV to Sony Vegas
Convert MKV to MP4 with Subs
How to convert AVCHD to XviD in a few clicks
How to convert and play MKV via Plex Media Server
Guide: How to Encode Videos to M3U8 Format Easily
Import DVD movie files to Avid Media Composer 5/6/7
How to rip 3D Blu-ray to 3D MP4 for viewing on Freely VR
How to convert ISO to iTunes-friendly format in a few clicks
Transfer Blu-ray to QuickTime on Mac(Yosemite/Mavericks)
How to rip DVD movies to Davinci Resolve on Mac with ease
Convert MKV files for Editing in Pinnacle Studio 14/15/16/17/18
Convert MKV format to Premiere Pro CC7/CS6/CS5/CS4 on Mac
4K XAVC/XAVC S to Premiere Pro CS4/CS5/CS6/CC Workflow

Sunday, March 6, 2016

Possible Way to view full 3D Blu-ray films on Android and iOS via Zeiss VR One

Zeiss VR One Cinema app can play ".mov", ".mp4" file formats. It also can play a side-by-side 3D formatted 3D video, but it can not play your 3D Blu-rays. this article would very helpful for you to get full 3d Blu-ray movie experience on Zeiss VR One works with Android and iOS.

Source From: Enjoy 3D Blu-ray on iPhone/Android via Zeiss VR One

The ZEISS VR ONE is a one-of-a-kind device allowing us to take our first steps in the world of virtual reality. Its lightweight design and 100% portability make it the perfect companion for videos, games and augmented reality.

Leading-edge optical design and ZEISS precision lenses for the ultimate immersive visual experience. ZEISS VR ONE supports smartphones with display sizes between 4.7 and 5.2 inches and users can wear their eyeglasses as normal while using the headset.

If you have lots of 3D Blu-ray movies, ever thought of enjoying those 3D Blu-ray movies on your Zeiss VR One in a 3D virtual experience while lying on the bed? If so, you can hold on reading...


As we mentioned above, Zeiss VR One supports 3D SBS MP4 or MOV video. Therefore in order to enjoy your 3D Blu-ray movies in Zeiss VR One, you need to rip and convert 3D Blu-ray to SBS MP4 or MOV in 3D format. Frankly, it's not as hard as you imagine as long as you have a professional 3D Blu-ray Ripper like Brorsoft Blu-ray Ripper, which is specially designed for changing any 2D/3D DVD/Blu-ray to virtually all types of video formats like MP4, MOV, AVI, MKV, FLV, WMV, etc.

The program not only can assist you to legally remove the DRM protection from your commercial 3D Blu-ray movies easily, but also convert 3D Blu-ray to Zeiss VR One compatible 3D SBS MP4 or MOV format with fast speed while keeping excellent video quality. Besides Zeiss VR One, it also support other 3D output options for playing your 3D Blu-ray movies freely in other 3D devices. Now download the right version according to your situation and check out the steps below.


Simple Steps to Rip 3D Blu-ray for Watching on ZEISS VR One

Step 1. Import 3D Blu-ray movie

Launch the best 3D Blu-ray to Zeiss VR One converter. Click the disc button to add 3D Blu-ray movie to it. After the BD files are loaded, you can preview them on the right viewing window and take snapshots of your favorite movie scene if you want.


Step 2. Select output format for Zeiss VR One

Click "Format" bar and find "3D Video", there are a lot of format options for you. "MP4 Side-by-Side 3D Video (*.mp4)" is recommended for Zeiss VR One.


Step 3. Advanced Video/Audio settings

Click "Settings" button to do corresponding settings regarding to video, audio. Note that Zeiss VR One compatible audio has to be encoded in AAC or MP3. AC3 audio and DTS Dolby don't seem to work. Plus, in this Profile Settings window, you can also select 3D Anaglyph and 3D Depth.


Step 4. Start converting

After you have done all the settings, return to the main interface to hit Convert button to start 3D Blu-ray to Zeiss VR One converting process. When the conversion is finished, click Open button to get the output 3D videos.

More Topics:

Rip Disney Blu-ray Discs
Backup Blu-ray Losslessly
Rip Blu-ray on Mavericks
Remove Blu-ray Region Codes
Rip DVD to Store or View on Dropbox
Compresses Blu-ray videos to MKV Playback
Watch 3D Blu-ray medias with Archos VR Glasses
Play 3D Blu-rays in SBS 3D MP4 format on Gear VR
Rip Disney (3D) Blu-ray Effortlessly in Windows/Mac
Guide of Ripping DVDs for Viewing on Google Cardboard
Watching/Viewing 3D Blu-rays on Google Cardboard Side-by-Side

Tuesday, March 1, 2016

iPhone Videos Not Working With Pinnacle Studio 15/16/17/18 - Best Solution

Apparently many video, audio problems exist while importing and editing iPhone Video (H.264 MP4, MOV) in Pinnacle Studio 14/15/16/17/18.To solve the issue, a common practical way is to convert iPhone video to Pinnacle most compatible video like MPEG-2.

There is a trouble around me. How can I edit the .mov files created by the iPhone in Pinnacle Studio ? Got some tech support online, I got know, iPhone records .MOV videos in H.264 codec. While, Pinnacle Studio 15/16/17/18 is pretty picky with the codecs of what it'll accept; it doesn't like H.264. Even the Pinnacle can support the H.264 videos, the process is painfully slow. So how to get around this?


It would be to convert iPhone videos to a lossless format that is easier to edit for Pinnacle Studio. I used Brorsoft Video Converter to encode all of my iPhone videos to MPEG-2 for using in Pinnacle. This powerful video converter also can convert other videos including MP4, MKV, AVI, MXF, MTS, etc to Sony Vegas Pro, Pinnacle Studio, Windows Movie Maker, Avid Media Composer, Adobe Premiere Pro and more NLE supported format on Windows. Follow its step-by-step instruction below to learn how to encode iPhone files to MPEG-2 for Pinnacle Studio.

How to Convert iPhone video clips to Pinnacle Studio

Step 1: Add iPhone videos > Install and launch the iPhone video converter, and then click “Add Files” button to import your H.264 .mov files to the software.

Tip: If you wanna combine iPhone video clips into one file, you can click the “Merge into one” box.


Step 2: Select output format > Click “Format” bar to determine output format. Follow “Adobe Premiere/Sony Vegas” and select “MPEG-2(*.mpg)” as the output format. Besides, you can also choose WMV (VC-1) (*.wmv) if you want to get a relatively smaller output file.


Tip: Click Settings icon, you can customize audio and video parameters Video Codec, bit rate, frame rate, Audio codec, sample rate, audio channels.

Step 3: Convert iPhone H.264 to Pinnacle Studio> Click the convert button under the preview window, the converter will start encoding iPhone .mov clips for importing to Pinnacle Studio.

After the conversion is finished, just click “Open” button to get the converted iPhone MOV files to Pinnacle Studio 14/15/16/17/18 for further editing perfectly.

More Topics:

Open MOV files in EDIUS
How-To: Import MOV files to Sony Vegas
Import MTS files to Edit in Pinnacle Studio
Convert and Import WMV files to Pinnacle Studio
Encoding MP4 files to MPEG-2 for Pinnacle Studio
Import VOB files to Pinnacle Studio 14/15/16/17/18
Convert MXF to Pinnacle Studio 14/15/16/17 friendly formats
Convert and Import AVI files to Pinnacle Studio 14/15/16/17/18
Convert MKV files for Editing in Pinnacle Studio 14/15/16/17/18
Converting WebM format to MPEG-2 for Pinnacle Studio editing
Convert iPhone H.264 MOV to WMV for Windows Movie Maker
Convert/Import MOV videos to Pinnacle Studio for smooth editing
4K MXF/MP4/MOV/XAVC/XAVC S files to MPEG-2 for Pinnacle Studio