Monday, July 27, 2015

Can't Play AVI files on Xbox One - The Solution

Summary: This is a discussion on watching AVI within the Xbox One? If you have no idea how to transfer and play AVI on Xbox One, just read this article to figure out how to.

I always used to watch film files through my Xbox 360 but I can't figure out how to do so on the Xbox one. I now want to play AVI on Xbox One from my PC, but no idea. So I have scoured the internet, tried everything I could find, and have a decent solution.

Xbox One is more than just a game console. It is an entertainment hub for games, television, music, and videos. And although the available apps put a ton of media at your fingertips, you can get even more out of your Xbox One by configuring it to play your own video like AVI with it. So how to get and watch AVI files on Xbox One?

You can stream through networked approach, which assumes you have computers sharing the same network. There are two primary ways to do this. The first is to stream your media from your computer or tablet, and the second is to play it directly off of a USB drive. Well, whatever method you use, to avoid the format limit, a better solution is to convert AVI to Xbox One more compatible MP4, WMV format as I found there are many users are facing the trouble when streaming AVI to Xbox One.

To get the work done, a professional video converter program- Brorsoft Video Converter is highly recommended to help you finish the AVI to Xbox One conversion task. This video converter offers quite effective solution for you to convert almost all the videos including AVI, MKV, MOV, MTS, FLV, TiVo, VOB, MPG… to Xbox One friendly videos without quality loss. It also allows you to adjust the video, audio parameter to get a decent output video that you want. It has an equivalent Mac version entitled Brorsoft Video Converter for Mac , which can convert videos to Xbox One on Mac OS X (Mavericks and Yosemite included).

READ MORE: Play MKV on Xbox One | Play MP4 on Xbox One

How to convert and play AVI files on Xbox One

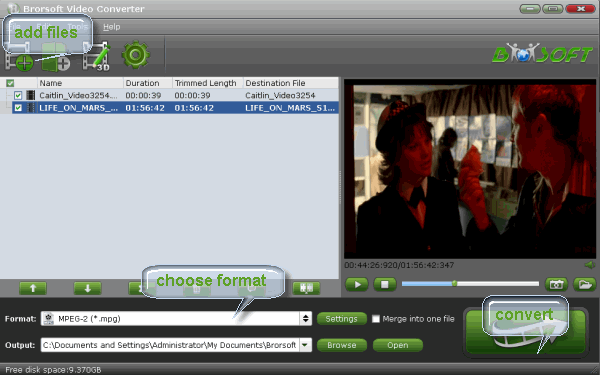
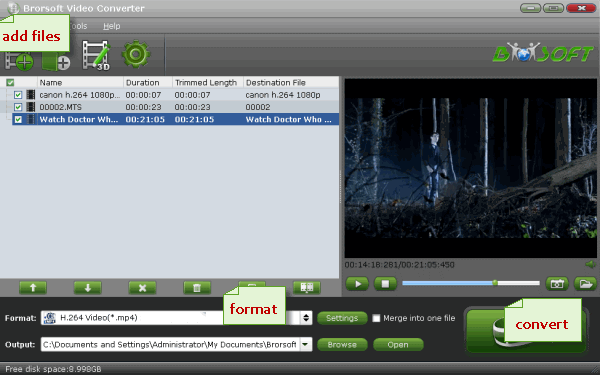
Step 1: Add AVI Files > Install and run the Xbox One Video Converter to your PC, click Add button to import your source videos .avi. Batch conversion is supported so that you can add multiple files.


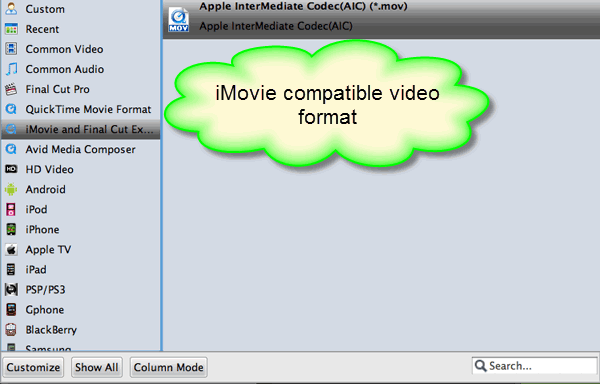
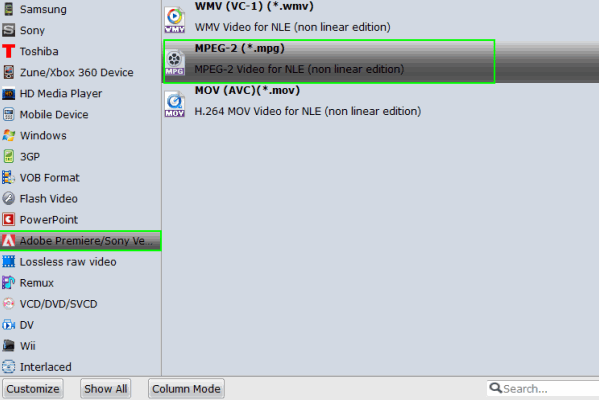
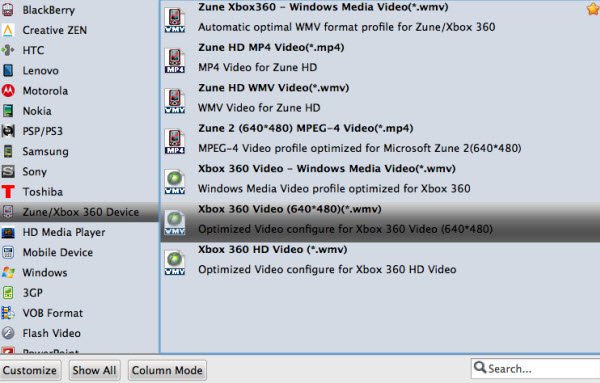
Step 2: Select output format > Click on the dropdown menu of “Format” and then move your pointer to "Zune/Xbox 360 Device"> "Xbox 360 HD Video (*.wmv), which fits on Xbox One as well.


Tip: Set output video quality

If you like, you can click “Settings” to change the video encoder, resolution, frame rate, etc. as you wish. According to my experience, the file size and video quality is based more on bitrate than resolution which means bitrate higher results in big file size, and lower visible quality loss, and vice versa.

Step 3: Start converting AVI for Xbox One > Click the “Convert” button to start converting AVI files for playing on Xbox 360/Xbox One. Once the process completes, just click “Open” to find the generated videos and transfer them to your Xbox One for enjoyment with ease.

More Guides:
How to Stream AVI files via Apple TV
How to prepare AVI files for playback via Plex
How to Play All AVI files on Android Phones

Monday, July 20, 2015

Workflow for Using Panasonic AJ-PX380 P2 MXF files in Final Cut Pro 7, FCP X with OS X

Come here to find out more about the features and specifications of Panasonic's AJ-PX380 4K camcorder, to make it easier for editing Panasonic AJ-PX380 P2 multi audio channels MXF videos with Final Cut Pro 6/7 on Mac OS X.

Panasonic AJ-PX380, a 1/3" AVC-Ultra shoulder-mount camcorder with networking capabilities and dual-codec recording, making it well suited to fast-paced ENG shooting. The camcorder accepts 1/3" to 2/3" lens adapters for use with existing 2/3" zoom and prime lenses and offers a variety of recording modes, including the full range of 100 Mbps AVC-Intra formats up to 1080/60p. It has dual microP2 card slots, a P2 card slot, and an SD card. Professional connections include HDMI out, HD/SD-SDI in/out, 3G-SDI out for 1080 60p video, genlock in/video out for multi-camera operation, timecode I/O, and USB2.0 (host and device) interfaces.

The multi-codec AVC-ULTRA offers 10-bit 4:2:2 recording in full quality, along with lower bitrate AVC-Proxy video for easy uploading or offline editing. It will record in AVC-LongG for on-air content and offers three bit rates: AVC-LongG50/25 providing bit rates of approximately 50/25 Mbps, and the more economical AVC-LongG12, which is optimized for field wireless workflows.

While, when you want to import AJ-PX380 MXF P2 files in FCP for editing, you will get frustrated due to the video codec incompatibility problem.


So for people who want to edit P2 MXF in FCP 6/7/X always want to keep the multiple audio/video track separately as original. Is it possible to solve this big puzzle?

Of course! YES! Come and meet the Brorsoft MXF Converter for Mac and follow these steps as below. With it you are allowed to preserve all or any audio tracks for output Prores .MOV and mix the multiple audio tracks into one if you need. Besides FCP, it also offers other optimized codec for non-linear editing programs, such as AIC for iMovie, DNxHD for Avid, MPEG-2 for Premiere .etc.

Free download the P2 MXF to FCP Converter

( Note: Click here for OS X 10.5)

How to convert Panasonic AJ-PX380 P2 MXF to Final Cut Pro

Step 1: Install and launch this P2 MXF Converter Mac on your computer. Transfer your MXF footages from Panasonic AJ-PX380 to the converter.

Tips:
1. If you are using FCP X, please make sure you have download and installed ProApps QuickTime Codecs manually, or you may get files with sound only without video.
2. When import MXF videos to the MXF Converter, please make sure you have the entire MXF file structure as it saved on your camcorder’s P2 card. If you only have some loose .MXF clips, your files will have image only without audio.
3. If you wanna merge several P2 MXF videos into one file, just tick the “Merge into one” box.


Step 2: Select output format

Click on the "Format" bar and get the dropdown menu, then move your pointer to choose "Final Cut Pro> Apple PreRes 422" or "Apple ProRes 422 HQ" or "Apple ProRes 4444" as the output format.


Tip: If you want to set some parameters for the output profile, you could click the "Settings" button to set the output bitrate, encode, frame rate, resolution, sample rate, channels, etc.

Step 3: Start conversion

Tap Convert button to start transcoding AJ-PX380 P2 MXF to ProRes .mov for Final Cut Pro 6/7/X on Mac OS X.

Once the conversion completes, you can click "Open" to find the .MOV videos which can be directly imported to FCP. Now you can edit MXF clips from Panasonic AJ-PX380 in Final Cut Pro 6/7/X without any problem.

More Topics:

How to Import MXF files to iMovie
How to Convert MXF files for Editing in Avid
How to Convert MXF footage for Editing in Premiere Pro

Thursday, July 16, 2015

Guide on Importing AVCHD Video from Sony Handycam HDR-CX900 to iMovie

By learning this article, you can easily convert and import Sony HDR-CX900 AVCHD MTS footage into iMovie for further editing on Mac OS X (10.10 Yosemite included).

The Sony HDR-CX900 is a high-spec Full HD camcorder designed for enthusiast and features many high quality features filtered down from their professional range. The camera is Full HD and can record simultaneously in AVCHD and MPEG-4, plus there is the newly developed XAVC S codec which can offer 50Mbps recording. The CX-900 also features 5.1-channel Dolby Surround sound for that truly cinematic experience.

I have been purchasing and using this Sony HDR-CX900 for a long time. While, when I import Sony HDR-CX900 Handycam MTS to iMovie for editing on Mac OS X, problems come out. Why?


The reason why we found that it is difficult to play and edit the Sony HDR-CX900 MTS videos with iMovie on Mac is due to its high rate compression and special codec. In order to make the AVCHD videos from Sony HDR-CX900 compatible with iMovie, the easy workaround is to convert Sony Handycam to iMovie edit-friendly format AIC. mov. For this purpose, this article mainly shows you how to transcode Sony HDR-CX900 videos for editing, playing in iMovie in detail. Below is the step-by-step instruction.

How to convert Sony HDR-CX900 footage into iMovie

1. You need to download, install and run Brorsoft MTS/M2TS Converter for Mac to achieve your goal.

This AVCHD MTS Converter for Mac is the solid tool to help users make the Sony Handycam MTS files transcoded on Mac OS X(Mountain Lion, Mavericks, Yosemite included). It offers the optimal preset profiles for iMovie, Final Cut Pro 6/7 and FCP X, Avid Media Composer, Adobe Premiere Pro, FCE and more. And there is no need to worry about the quality loss.

2. Click Add button to load your 1080 60p MTS files the program. It supports batch conversion. And if want to join MTS clips into one just click the “Merge into one file” box.


3. To convert Sony Handycam MTS to iMovie, choose iMovie and Final Cut Express > Apple Intermediate Codec(AIC) (*.mov) as the target format.


Tip: The smart Sony Handycam MTS Converter Mac also allows you to tweak the video, audio settings. Just click “Settings” to set video frame rate, video size and Video Bitrate as you want.

4. As soon as all things are finished, please click “Convert” button to start transcoding Sony HDR-CX900 videos to iMovie on Mac OS X.

Once the conversion process shows 100%, you can smoothly copy the converted files to iMovie with smooth workflow.

Additional Tips: For those who record XAVC S videos on Sony HDR-CX900, you’d better get Brorsoft Video Converter for Mac to fast solve the Sony HDR-CX900 XAVC S to FCP/iMovie/Adobe PP/Avid MC importing and editing issues.

See more:

How to Convert Sony Handycam files to MP4
How to Edit Sony Handycam files in Windows Movie Maker
How to Load Sony Handycam AVCHD videos to Mac FCP/iMovie/FCE

Monday, July 13, 2015

Convert OBS recordings to Sony Movie Studio losslessly

Summary: This guide shows how to convert OBS files to Sony Movie Studio, so you can edit OBS video on Sony Movie Studio smoothly.

When you try to import OBS files to Sony Movie Studio for editing, you will get an error message saying it couldn't initialize it or something similar to that. As you know Open Broadcaster Software(OBS) generally can record MP4 Videos(FLV is another option). Although Sony Movie Studio says it supports MP4, but it only prefers MPEG-4 codec instead of others. In order to successfully import and open OBS MP4 in Sony Movie Studio, it is better to convert OBS files to Sony Movie Studio more compatible format.

Since MPEG-2 is one of the most compatible for Sony Movie Studio, which ensures maximum editing quality and efficiency, the common practice for OBS to Sony Movie Studio workflow is, get a video converter and transcode OBS files to MPEG-2, which will save you both time and trouble. All you need is to drag the result videos for prompt editing. The following will show a step by step guide on how to convert, edit and import OBS files to Sony Movie Studio 10/11/12/13.

How to Convert OBS files to Sony Movie Studio friendly video types

First download and install Brorsoft Video Converter.

The program is the best Video Converter for OBS footage. With this OBS video converter, you can effortlessly convert OBS MP4 to MPEG-2, which will create a Sony Movie Studio friendly file format keeping the original quality. Besides Movie Studio, this software can also export DNxHD for Avid, WMV for Windows Movie Maker, MPEG-2/MOV for Adobe Premiere Pro and more NLE systems for native editing.

1. Start the OBS to Sony Movie Studio converter, and then click the “Add” button to load the OBS .mp4 videos. You can also use the drag-and-drop method to load the media files to the application UI.


2. Click "Format" menu firstly and then follow "Adobe Premiere/Sony Vegas" > " MPEG-2 (*.mpg)" as the output format.


Tip: Click the Settings icon to adjust video and audio parameters on the Profile Setting as you need to get the best quality video.

Step 3: Simply click the "Convert" button to start converting OBS files for Sony Movie Studio and everything else will be automated.

When the conversion is finished, you can click “Open” button to get the generated MPG files effortlessly. Now, it’s much easy for you to import OBS files to Sony Movie Studio 10/11/12/13 for further editing.

More Guides:

The Best Video Player for Mac
How to Use OBS Recordings in iMovie
Editing OBS Files in Premiere Pro Smoothly
The Best 5 Universal Video Players For Mac
Operation Guide of Brorsoft DVD Ripper for Surface RT
Converting OBS FLV to Apple ProRes for Editing in FCP
Convert OBS MP4 to Sony Movie Studio acceptable format
Rip DVD movies to Microsoft Surface RT supported MP4 format

Tuesday, July 7, 2015

AVI to ProRes: Get AVI rewrapped into ProRes

Summary: Looking for a professional tool to encode AVI format to ProRes? Below is how to.


"Is there anybody here meet problems while importing AVI videos into FCP? I have got some AVI files that I want to edit them in Final Cut Pro. Every time I try to import the AVI video to FCP it crashes. Do I need to convert videos into ProRes first before loading into FCP timeline?"

Apple ProRes is Apple's professional visually lossless video codec, which compresses video very mildly. It is a kind of intermediate Codec optimised for capturing and editing video especially with Final Cut Pro. Thus, if you wanna edit AVI videos in FCP, you'd better change AVI to ProRes first since AVI is merely a wrapper for many different codecs that FCP can not afford well.

Brorsoft Video Converter for Mac is a perfect video converting software for Mac users to transcode AVI videos to Apple ProRes 422 (*.mov), Apple ProRes 422(HQ) (*.mov), Apple ProRes 422(LT) (*.mov), Apple ProRes 422(Proxy) (*.mov), Apple ProRes 4444 (*.mov). Besides FCP ProRes codec, it also supplies other codecs for NLEs including MPEG-2 for Premiere, AIC for iMovie, DNxHD for Avid and more. Now, download the software on Mac and follow the guide below to start conversion.

How to Encode AVI format to ProRes

Step 1: Open Converter program on Mac and click the "Add" button to import your AVI videos. You can check the "Merge into one" box to join some clips together if you need.


Step 2: Go to "Format" page to choose Apple ProRes 422(*.mov) as target format from the presets list in "Final Cut Pro". Of course, Apple ProRes 422 (HQ)(*mov), Apple ProRes 422(LT)(*mov), Apple ProRes 422(Proxy)(*mov) are also the proper format for FCP 7/X.


Step 3: In the Profile "Settings" page, you can adjust the video and audio parameters including bitrate, video size, frame rate, channel and more.

Step 4: Tap the Convert button to start transcoding AVI formats to ProRes for FCP 6/7/X on Mac OS X.

After conversion, you can get the encoded AVI videos via "Open" panel. Now you can launch the FCP to add the generated ProRes files freely.

Read more:
How to Import AVI to Adobe Premiere
How to Play DVD ISO image on Mac
How to convert and import AVI to Avid MC
Open and Edit (DivX, Xvid)AVI video in FCP 7/X
Best Way to Import MKV to iPad Mini for Enjoying
How to Convert and Import AVI videos to iMovie 11
Importing Sony a7II XAVC S to Avid Media Composer
Convert MP4 to Sony Movie Studio without quality loss
Convert Sony HDR-MV1 MP4 video to Sony Vegas 13/12
Edit Canon XC10 4K/1080p MXF on Mac OS X(Yosemite)
Import UHD 4K xavc s files from Sony RX10 MK II to FCP 7

Thursday, July 2, 2015

Convert MP4 to Sony Movie Studio without quality loss

Summary: Having problems importing MP4 into Sony Movie Studio? If so, just follow this simple tutorial to convert MP4 to Sony Movie Studio more compatible MPEG-2 video.


As an ideal video editing tool, Sony Movie Studio is widely used by video professionals and hobbyists. Although Sony Movie Studio says it supports MP4 format, you will still find it’s a painful experience to import MP4 to Sony Movie Studio for editing. There’re some frequently asked MP4 to Sony Movie Studio incompatible issues quoted as below.

Q1: Video capture from snagit v11 is great except that resulting MP4 files cannot be loaded into Sony Movie Studio. Is there any option to solve the issue?

Q2: I'm trying to import footage (.MP4 format) that was shot on a Sony EX1 camera into Sony Vegas Movie Studio 10. Unfortunately Vegas won't allow me to import it and an error message comes up saying; "Warning: An error occurred while loading the project file. The file is most likely corrupted or of an unknown format."

After goggling the problem, I discovered that Sony Movie Studio has difficulties importing some MP4 files like the captured files in h.264. So, what is the best way to tackling this problem? Actually, the simple and effective way to get rid of the issue is to convert MP4 into another format that Sony Movie Studio can handle.

To change MP4 to Sony Movie Studio compatible file type, you can get help from Brorsoft Video Converter. The program is an easy-to-use MP4 file converter for you, which can help you convert all kinds of MP4 videos into a different format like MPEG-2 for Sony Movie Studio with least quality loss. You should then be able to import the new file into Movie Studio with smooth editing without any trouble. It will ensure a perfect MP4 file importing, playing and editing workflow with Sony Movie Studio 10/11/12/13. Download the program now and start the conversion task.

Tutorial: Converting MP4 files to Sony Movie Studio

Step 1: Load MP4 files to the program

Run the video converter, and then click the “Add” button to load the .mp4 videos. Check the “Merge into one” box, you can join several MP4 clips together.


Step 2: Choose output format

Click “Format” bar and choose "Adobe Premiere/Sony Vegas > MPEG-2 (*.mpg)” as output format on the drop-down menu.


Step 3: Adjust the video, audio settings

Click "Settings" to fix the frame rate, bitrate, video size, etc to your needs. To have a smooth editing with Sony Movie Studio, you need create the files with the appropriate resolution and frame rate that matches your source footage.

Step 4: Start MP4 to Movie Studio conversion

Click the big "Convert" button at the bottom right corner to finish encoding MP4 to MPG for Sony Movie Studio.

When the conversion is done, you can find the output files by clicking "Open" button on the main interface, then you can transfer the converted MP4 files to Sony Movie Studio 10/11/12/13 to play and edit without any problem.

Additional Tips:

This excellent MP4 to Sony Movie Studio Converter not only can convert MP4 files to Sony Movie Studio, but also can convert MP4 as well as MKV, FLV, VOB, WMV, MOV, AVI, etc files for using in Windows Movie Maker, Pinnacle Studio, Sony Vegas Pro, Adobe Premiere Pro, Avid Media Composer and more NLEs. Just choose a proper output format in 2nd step.

If you have any problems importing, editing or playing MP4 files on your Mac or PC, please enter "MP4 Related Guides & Tips" to find the solutions.

More Topics:

Embed and Play DVD movies in PowerPoint
How to Open MP4 files in Windows Movie Maker
Play MKV/MP4/VOB/MTS/ProRes/YouTube on PPT
Can't import MP4 files into Premiere Elements - Fixed
How to Edit and Import MP4 files into Sony Vegas Pro
Convert and insert DVD (ISO, IFO) to PowerPoint on Mac
Solution to Open and Edit MP4 files in Sony Movie Studio